Description
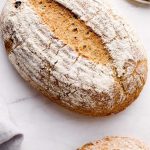
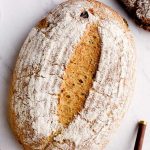
Gluten Free Olive Bread with chewy crust, soft interior, and salty olives. Whole grain and vegan adaptable!
Ingredients
Scale
Dry ingredients:
- 130 grams (1 cup) gluten free sorghum flour
- 125 grams (1 cup) gluten free brown rice flour
- 90 grams (1 cup) gluten-free oat flour
- 75 grams (1/2 cup) gluten free quinoa flour
- 6 grams (1 teaspoon) sea salt
Wet ingredients:
- 2 1/2 cups warm water, between 105 and 110 degrees
- 10 grams (1 tablespoon) active dry yeast
- 2 tablespoons maple syrup OR honey
- 30 grams (1/2 cup) whole psyllium husks
Add-ins:
- 1/2 cup pitted olives
Instructions
- Whisk together all of the dry ingredients in the bowl of a stand mixer. Fit the mixer with the paddle attachment.
- In a bowl, whisk together the water, yeast, and maple syrup. Let sit for 10 minutes. The mixture should be frothy and smell of warm yeast. (If the mixture is not frothy, the yeast is expired and the bread will not rise. It is best to start over with a new batch of yeast.)
- Whisk in the psyllium husks, making sure there are no clumps. Allow this mixture to sit for 5 minutes, until thick.
- Add in the wet mixture to the dry. Mix on medium speed until well incorporated and the dough forms a loose ball. Stir in the olives with a spatula.
- Remove the dough from the mixer and kneed a few times on an oiled surface. The dough is very sticky, so you might find it helpful to oil your hands, too. Form the dough into a ball by tucking the sides underneath until it is round. Place in an oiled bowl, seam side down.
- Cover with a towel and let rise in a warm, even temperatures place for 45 minutes to an hour. The dough should double in size.
- Once the dough has risen, kneed a few times on an oiled surface. Once again, form the dough into a round ball, or oval (depending on your proofing basket), by tucking the edges underneath. Return to the bowl (or floured proofing basket), this time seam side up. Let rise for 30-45 minutes, or until the dough has doubled in size.
- While the dough is rising, place a cast iron skillet on the lower middle oven rack. Preheat the oven to 425 degrees. You want to let the oven preheat during the entire second rise. This ensures that the oven is at an even temperature when baking the loaves.
- After the second rise, line a baking sheet with parchment paper. Carefully tip the bread out onto the baking sheet. Using a sharp knife, make a few shallow cuts in the top of the bread.
- Add a cup of ice to the cast iron and immediately add the bread to the upper rack, and quickly shut the oven door. Bake for 50 minutes. Remove from the oven and let the bread cool completely on a wire rack, several hours, before slicing.
Notes
Bread stores well on the counter, wrapped in a towel or linen bread bag for 3 days. You can also slice and freeze the bread for up to 3 months. Toast the slices from frozen.
If you don't have a stand mixer, you can still make this recipe. Whisk the dry ingredients together in a large bowl. When you add in the liquid, stir it together with your hands, kneading as necessary to fully incorporate all the flour into the dough.
Nutrition
- Serving Size: 1 slice (1/12th recipe)
- Calories: 141
- Sugar: 2g
- Sodium: 198mg
- Fat: 2g
- Saturated Fat: 0g
- Carbohydrates: 29g
- Fiber: 4g
- Protein: 4g
- Cholesterol: 0mg