
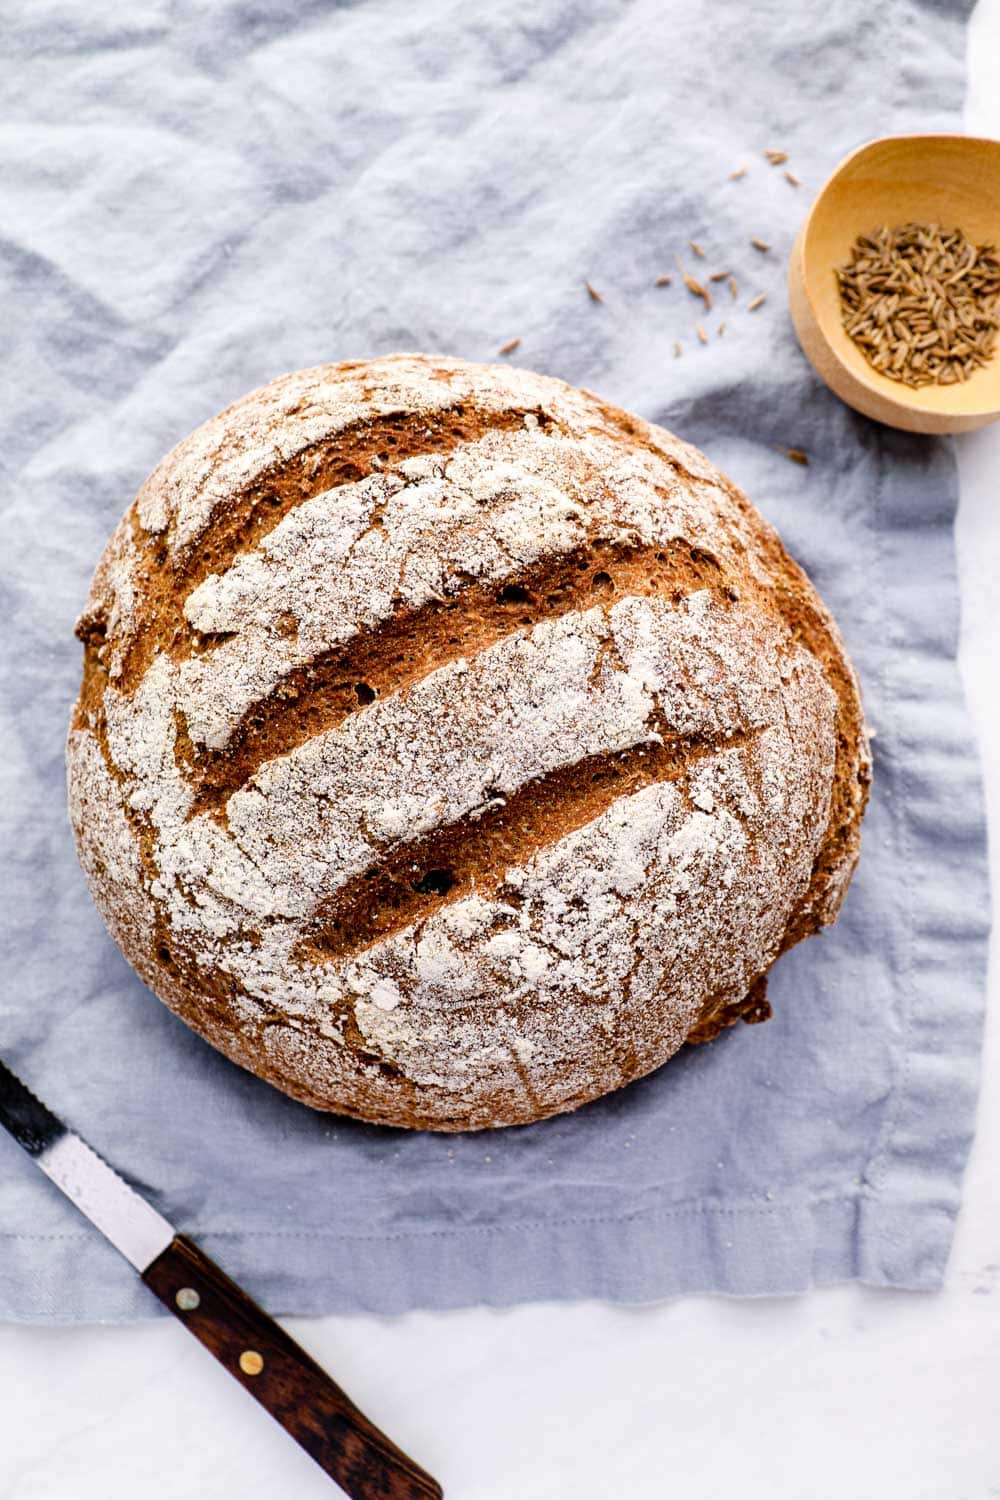
Gluten Free Rye Bread has all the rich rye flavor without gluten containing rye flour! This loaf has a perfect crust and fluffy interior.

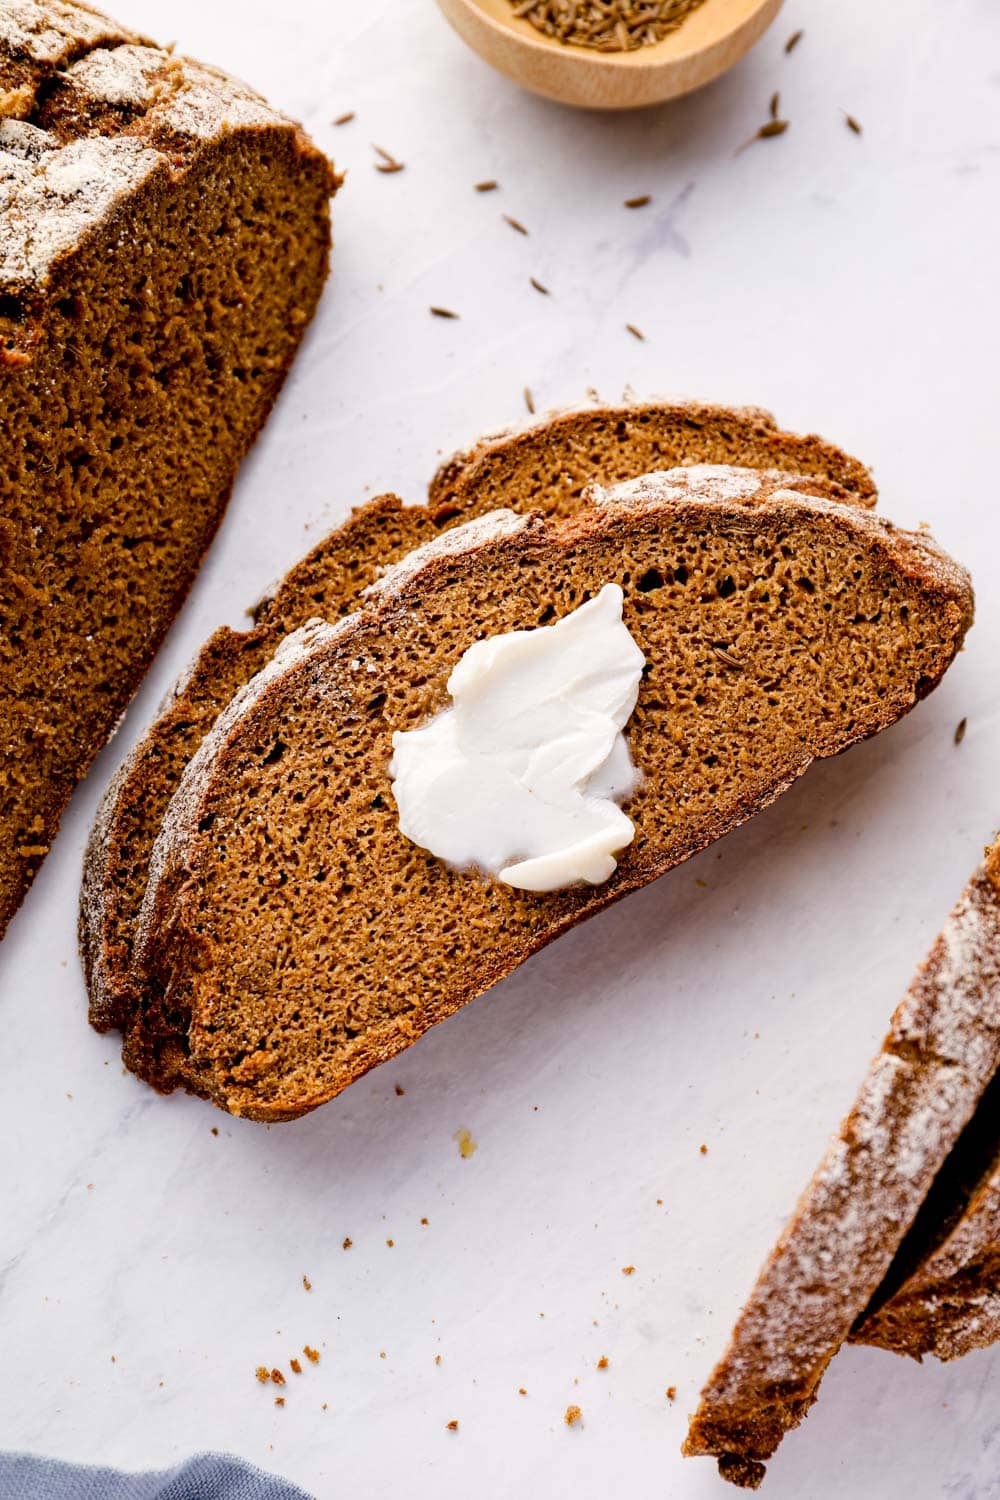
Rye bread. There's really nothing else like it. It has rich earthy flavor and a rich deep brown color.
This gluten free loaf is flavored with caraway seeds and molasses for traditional rye flavor! It's also made with a blend of gluten free flours that keep this loaf light and fluffy, mot dense as some rye loaves can be.
Reasons to love this recipe!
- This load has all the flavor of rye bread without the gluten!
- It can be baked as a round (pictured) on in a loaf pan for sandwiches.
- It's gluten free, whole grain, and vegan.
Ingredients:
- Sorghum flour - make sure all flours are certified gluten free!
- Brown rice flour
- Oat flour
- Quinoa flour
- Cacao powder - or cocoa powder. The cacao powder gives the bread color and depth of flavor.
- Caraway seeds - for traditional rye flavor.
- Warm water - between 105 and 110 degreed fahrenheit. I like to use this digital thermometer to make sure I get the temperature right.
- Molasses - the bread will work with another liquid sweetener, but molasses is a key component of rye flavor, so substitute at your own risk.
- Active dry yeast - I buy it in bulk and store it in my freezer
- Psyllium husks - in their whole form, not powder. They give the bread an incredible texture and chew.
How to make gluten free rye bread:
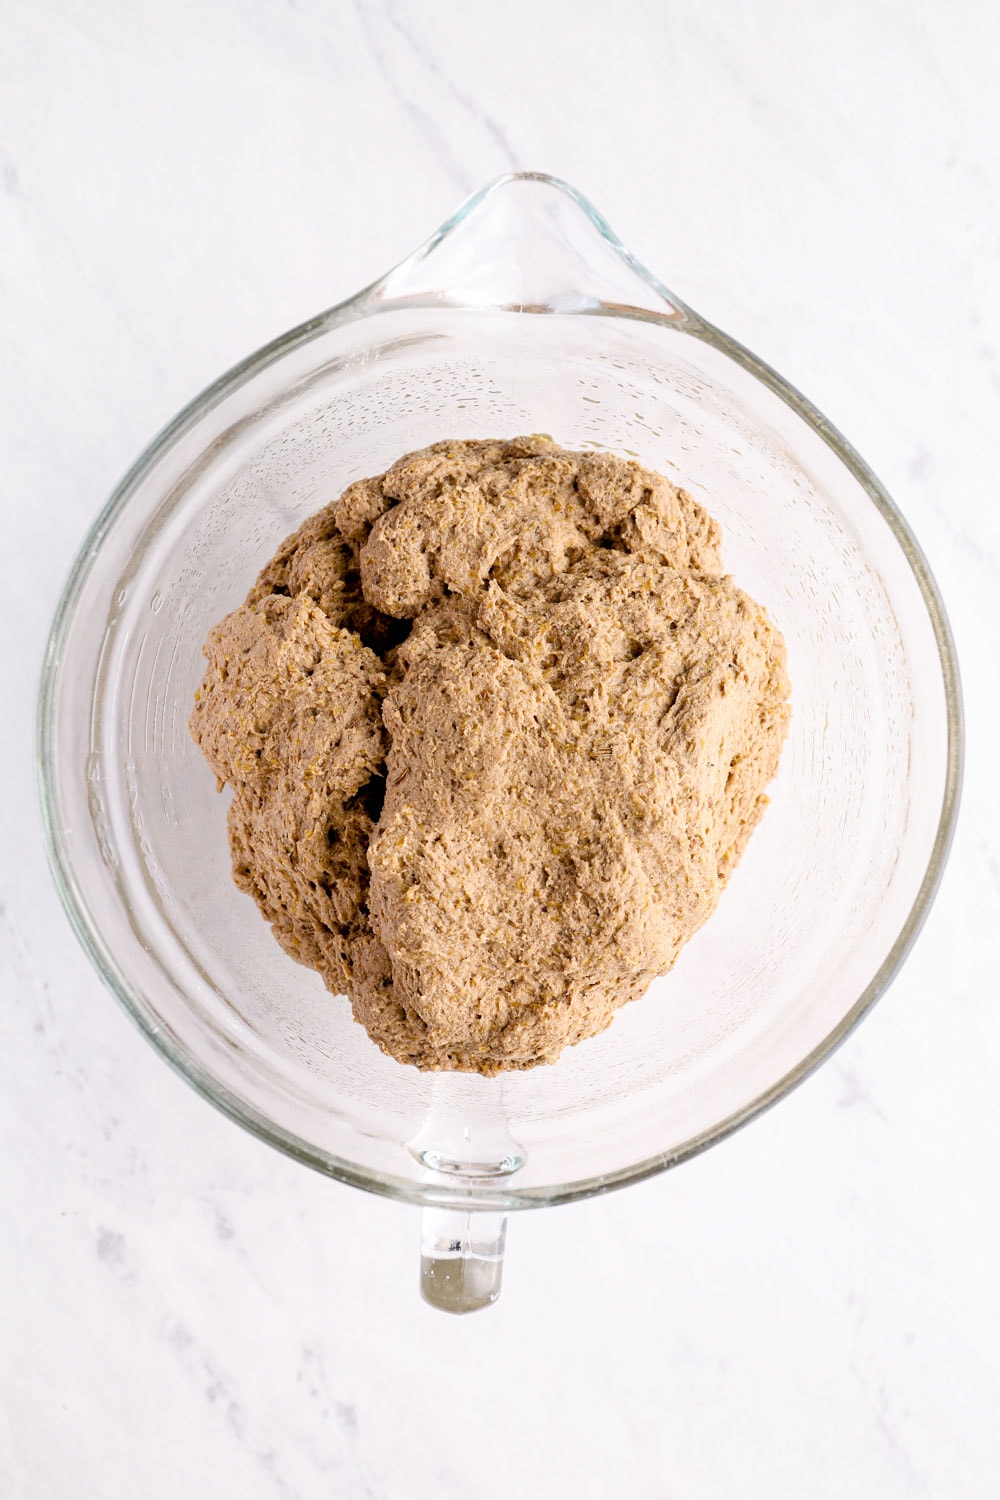
Mix the dry ingredients: I usually mix them together right in my stand mixer. Saves a bowl to clean up later!
Bloom the yeast: Stir together the warm water, yeast, and molasses. Set this aside for 10 minutes. The yeast should get nice and frothy. The froth lets you know the yeast is active and ready to go. If your yeast doesn't froth after 10 minutes. Try one more time and make sure the water temperature is correct. If it still doesn't froth, your yeast has expired. You'll need to get a fresh batch before making this recipe.
Gel the psyllium husks: Stir in the psyllium husks and set aside for another 5. They will thicken and create a gel-like consistancy.

Mix and rise #1: Add the wet ingredients into the dry and mix on medium speed until combined. Shape the dough into a ball, place in an oiled bowl, cover with a tea towel, and let rise for 1 hour.

Preheat and prep the oven: If you have one, place a baking stone on the lower rack. The stone helps maintain an even oven temperature and a more even bake on the bread. On top of the stone, place a cast iron skillet or baking dish. Preheat the oven to 425 degrees.
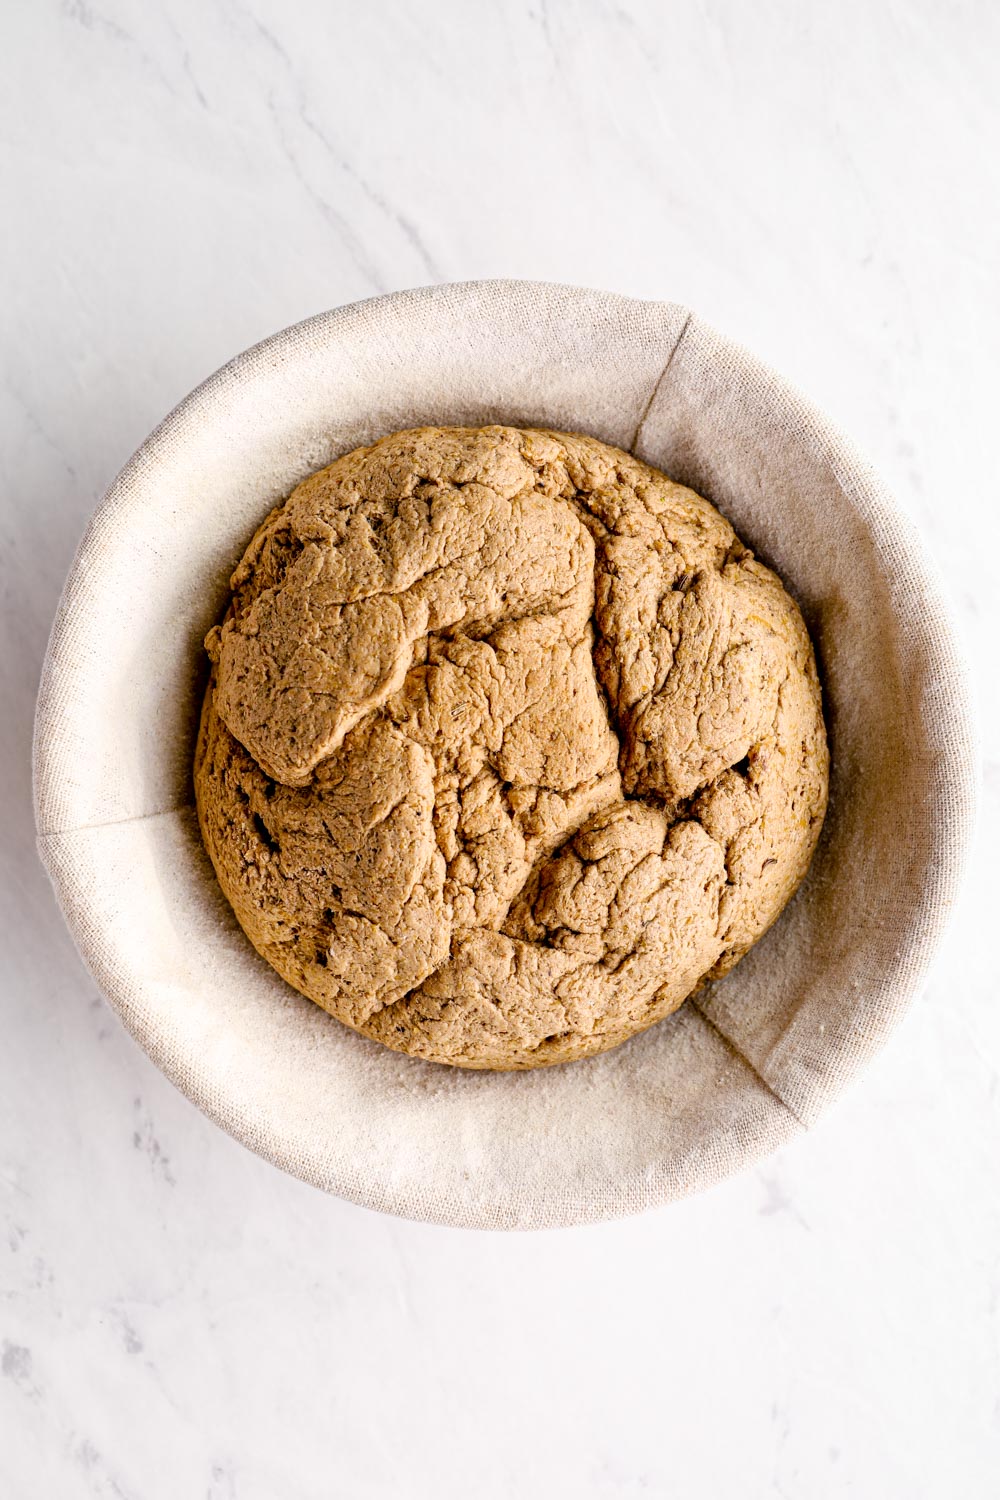
Rise #2: Once risen, kneed the dough, form into a ball again, and place in a proofing basket. Let rise for another 45 minutes. Alternatively, you could let the bread rise again in the same bowl, but the loaf will be shorter and squatter. The proofing basket helps create a tall, well shaped, loaf - and they are super affordable!

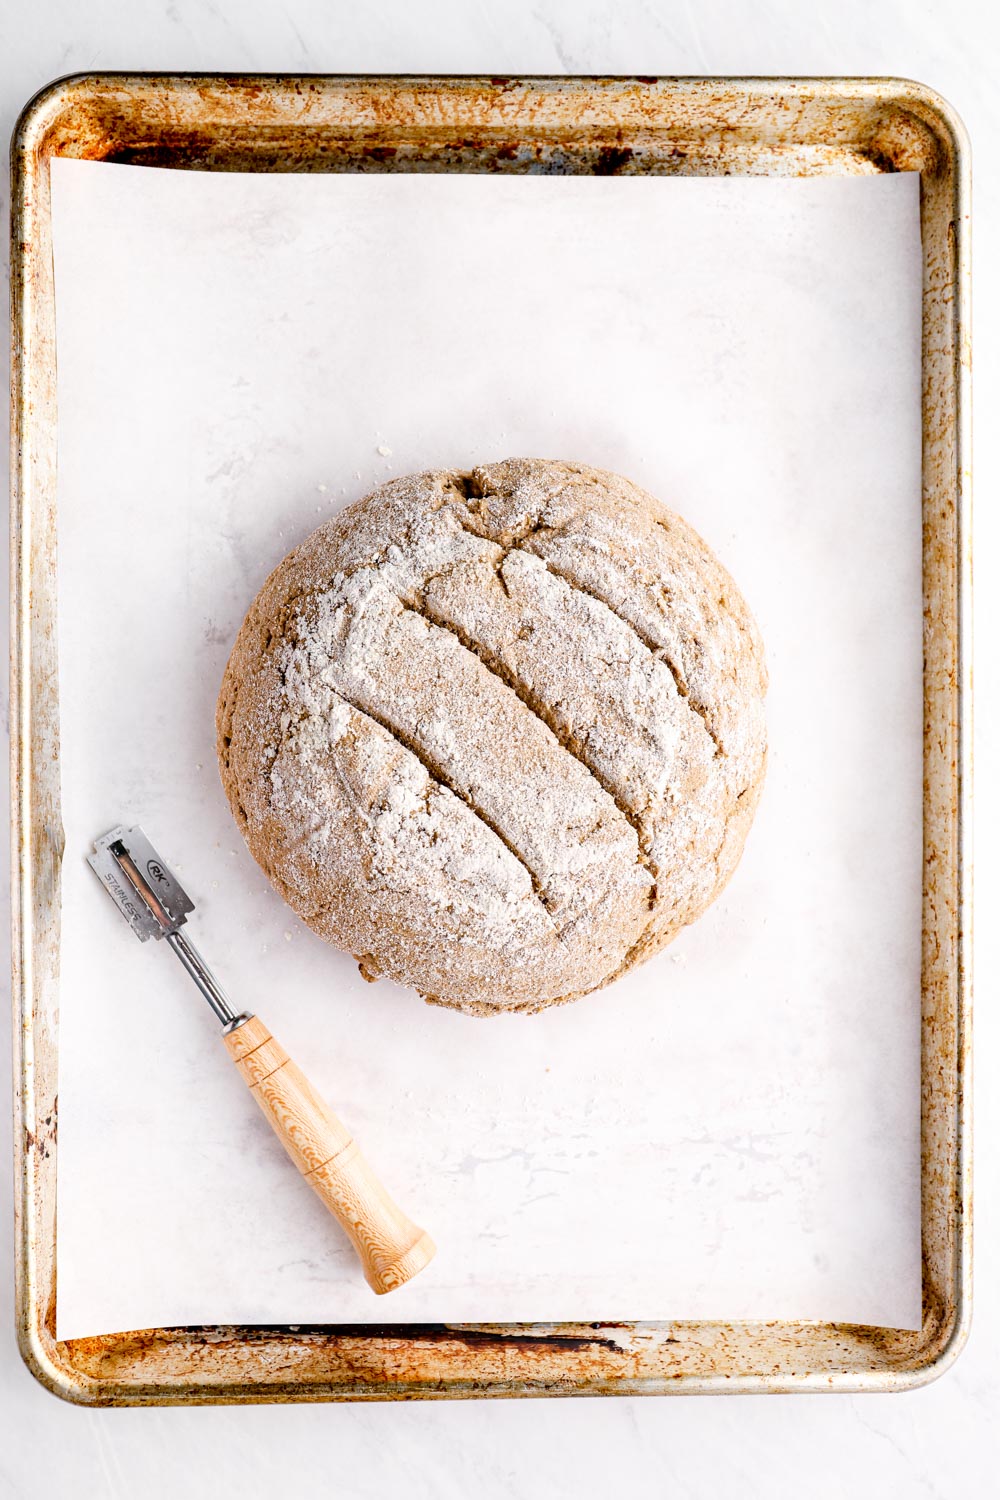
Bake: Gently tip the dough onto a sheet pan. Score the top of the bread using a lame or very sharp knife. Fill a drinking glass with ice cubes and add them to the cast iron or baking dish. Quickly transfer the bread to the oven and bake for 55-65 minutes. Let cool completely on a wire rack. Enjoy!
Storage:
Store leftover bread in the counter in a linen bread bag for 3-4 days. You can also store it cut side down on a cutting board for 2-3 days.
For longer storage, slice and freeze for up to 3 months. Toast slices from frozen.
How does gluten free rye bread get its flavor?
Traditionally rye bread uses rye flour which contains gluten. While rye does give the bread a deep dark brown color, it actually doesn't add that much flavor. When people think of that traditional rye flavor, it doesn't come from rye flower, but from a few additional ingredients.
The first and most important is caraway seeds. These seeds, which look similar to fennel and cumin seeds, pack tons of rye flavor. Use whole cumin in this recipe. They add just enough flavor without being overpowering.
Second, molasses adds the nutty sweetness associated with good rye bread. It also helps our bread achieve a nice dark color.
Last, cocoa, or cacao, powder is added to further enhance color as well as to deepen and round out the flavors.
Rye bread without rye flour is totally possible! Just add these three ingredients and you'll be enjoying that crave-able rye flavor.
What to make with rye bread
- It makes great toast with peanut butter, smashed avocado, or eggs.
- Perfect for a reuben sandwich. And so many other sandwiches!
- Or simply enjoy it sliced and spread with plenty of butter!
More gluten free bread tips?
Check out this Artisan Gluten Free Bread Post! It is PACKED with information and can answer all your questions from psyllium husks to baking without a stand mixer, to achieving the best crust.
More gluten free bread recipes!
Print
Gluten Free Rye Bread
- Prep Time: 10 minutes
- Rise Time: 1 hour 45 minutes
- Cook Time: 50 minutes
- Total Time: 2 hours 45 minutes
- Yield: 12 servings 1x
- Category: Sides
- Method: Oven
- Cuisine: German
- Diet: Gluten Free
Description
Gluten Free Rye Bread has all the rich rye flavor without gluten containing rye flour! This loaf has a perfect crust and fluffy interior.
Ingredients
Dry ingredients:
- 130 grams (1 cup) gluten free sorghum flour
- 125 grams (1 cup) gluten free brown rice flour
- 90 grams (1 cup) gluten-free oat flour
- 75 grams (½ cup) gluten free quinoa flour
- 10 grams (2 tablespoons) cacao powder or cocoa powder
- 6 grams (1 teaspoon) sea salt
- 10 grams (2 teaspoons) whole caraway seeds
Wet ingredients:
- 2 ½ cups warm water, between 105 and 110 degrees
- 10 grams (1 tablespoon) active dry yeast
- 3 tablespoons molasses
- 30 grams (½ cup) whole psyllium husks
Instructions
Whisk together all of the dry ingredients in the bowl of a stand mixer. Fit the mixer with the paddle attachment.
In a bowl, whisk together the water, yeast, and molasses. Let sit for 10 minutes. The mixture should be frothy and smell of warm yeast. (If the mixture is not frothy, the yeast is expired and the bread will not rise. It is best to start over with a new batch of yeast.)
Whisk in the psyllium husks, making sure there are no clumps. Allow this mixture to sit for 5 minutes, until thick.
Add in the wet mixture to the dry. Mix on medium speed until well incorporated and the dough forms a loose ball.
Remove the dough from the mixer and kneed a few times on an oiled surface. The dough is very sticky, so you might find it helpful to oil your hands, too. Form the dough into a ball by tucking the sides underneath until it is round. Place in an oiled bowl, seam side down.
Cover with a towel and let rise in a warm, even temperatures place for 45 minutes to an hour. The dough should increase by 50 percent.
Once the dough has risen, kneed a few times on an oiled surface. Once again, form the dough into a round ball, or oval (depending on your proofing basket), by tucking the edges underneath. Return to the bowl (or floured proofing basket), this time seam side up. Let rise for 30-45 minutes, or until the dough has increased by 50 percent.
While the dough is rising, place a cast iron skillet on the lower middle oven rack. Preheat the oven to 425 degrees. You want to let the oven preheat during the entire second rise. This ensures that the oven is at an even temperature when baking the loaves.
After the second rise, line a baking sheet with parchment paper. Carefully tip the bread out onto the baking sheet. Using a sharp knife, make a few shallow cuts in the top of the bread.
Add a cup of ice to the cast iron and immediately add the bread to the upper rack, and quickly shut the oven door. Bake for 50 minutes. Remove from the oven and let the bread cool completely on a wire rack, several hours, before slicing.
Notes
Storage: Bread stores well on the counter, wrapped in a towel or linen bread bag for 3 days. You can also slice and freeze the bread for up to 3 months. Toast the slices from frozen.
Mix by hand: If you don't have a stand mixer, you can still make this recipe. Whisk the dry ingredients together in a large bowl. When you add in the liquid, stir it together with your hands, kneading as necessary to fully incorporate all the flour into the dough.
Nutrition
- Serving Size: 1 slice (1/12th recipe)
- Calories: 118
- Sugar: 3g
- Sodium: 204mg
- Fat: 1g
- Saturated Fat: 0g
- Carbohydrates: 24g
- Fiber: 4g
- Protein: 4g
- Cholesterol: 0mg
I am going to make this this weekend. I’m so excited to found your recipe! In the instructions you mention whole cumin seeds but the instructions do not indicate that… How much cumin seed should I add?
Thank you so much!
Sandra
Hi Sandra, you'll add 2 teaspoons (or 10 grams) caraway seeds to the dry ingredients in the first step of the recipe.
I just found your recipe and exited to see that it’s gluten, corn, xanthan gum, egg, and oil free. My allergies are severe and most recipes contain all of the ingredients above. Can I use psyllium husk powder instead of whole psyllium husk, and if so how much? Thank you for your time. Look forward to your reply.
Hi Jennifer! So glad you found the recipe :) I would definitely recommend sticking with whole psyllium husks. Powder tends to thicken and clump together causing lumps in the bread. Happy baking!
Hi Laurel, very happy I came across your recipe!
I made it today and the crumb is very moist and kind of sticky — is this normal? I tested the internal temperature of the bread and made sure it was 210F before pulling it out. And I let it cool completely before slicing. Also, I found it challenging to shape the dough into a smooth ball; it kept cracking and was difficult to make it into a seamless round. Not sure if this is how the dough is supposed to be?
Hi Emilye! The texture of the bread should not be sticky or overly moist. However, it will feel more moist than traditional gluten bread - so it depends on what you are comparing it to :) It does seem like yours sounds stickier than usual. Did you make any substitutions? Specifically to the psyllium husks or flours? Also did you bake by weight or use measuring cups? Hoping we can problem solve this for you!
Thank you for this recipe! I tried it and it has great flavor. Texture was sticky and kind of gummy though, and it didn’t rise much — perhaps I underproofed it? also, my dough was difficult to knead together smoothly; it had cracks on top and I wasn’t able to get it into a smooth ball. Is this normal?
I made the rye bread today. What a treat. I did have to bake the bread 10 extra minutes. Delicious. Thank you so very much. Wish I could share a picture…
Thank you so much for the review Susan! So glad the bread turned out :)
Hi Laurel, I am familiar and experienced in baking, including artisanal breads. I weighed ingredients on my scale, yet it came out like batter. The only difference between your recipe and what I did was I "ground my own" flours in my cuisinart. I had purchased the sorghum flour, but didn't want to spend $50 for the bags of the others, since i had brown rice, oats and quinoa on hand.
In order to "save" it, I mixed in rye flour (had purchased that for another recipe) until it was a sticky dough (still wet and barely formed). It rose well the first time, but maybe the increased amount of grains made the second rise too little.
I plopped it into loaf pans. The texture is dense, chewy, but the flavor is good. We are on a "cleanse" right now, so it's good to have bread again (low-salt rye is on the second week of the plan).
Would you happen to have tips on making flour from the common ingredients?
Dawn, thank you for writing in! I think the culprit was the home ground flour. Likely the grind was not as small as store-bought limiting the surface area for the water to be absorbed into the bread. If you want to grind flour at home, I would recommend a countertop grain mill, though they can be quite expensive its the only way to get the correct grind for baking bread (other recipes, like muffins, can be more forgiving with home ground flour). I make this bread often so I purchase flour in bulk from Azure Standard or my local health food store to help with the cost! Most all of the bread recipes on this site use these same base flours, so you can use them in our other recipes too! Happy baking and please let me know if you have any more questions!
I have been craving rye bread for almost two weeks now. This was the best gluten free bread I've made so far. I did make substitutions since I have a sensitivity to grains so I did: 345g buckwheat, 45g almond flour, and 30g potato starch. I also used maple syrup instead of molasses since that's what I had on hand, but definitely planning molasses for the next batch. Incredible texture, crumb, and flavor. Thank you so much for posting this.
I was wondering what suggestions you might have if I wanted to make this a sandwich style loaf instead of a boule.
Thank you so much for your review Jo! For a sandwich style loaf, you will transfer the dough to a loaf pan instead of a proofing basket for the second rise, let it rise, leave it in the pan, and proceed with baking as usual. For me, is doesn't turn out with the smooth top crust that conventional sandwich bread has, but it is still delicious! If you get the chance, let me know how it goes!
Would have been 5 stars, but for an error between the “blog” part and the actual recipe:
In the “blog” part, which experienced bakers (humbly, like myself) are inclined to skip, the oven temperature is to be set at 400 degrees.
In the actual recipe part, the temperature is to be set to 425 degrees. That’s quite a difference!
I thought the bake time of 50 minutes @ 425 was excessive, it was, and the bread was done (to 205 degrees internal) at just over 30 minutes.
Maybe at 400 degrees it would have taken 50, hard to say.
Anyway, aside from the could-be-serious proofreading error, the recipe is great and thanks for sharing it!
Hi Paul, thank you for noticing the typo. The recipe card is correct. All of our gluten free artisan breads on the site are baked at 425 for 50 minutes. The bread will not dry out with the longer bake due to the low absorbency of these glute free flours and it allows a really nice crust to form. Of course, you are the captain of your kitchen and adjusting the recipe to suit your tastes is always encouraged. Happy baking!
I love the idea of rye bread. The instructions are confusing. Putting bread on baking sheet? Then into cast iron? Ice cubes in cast iron pan around bread? Can't wait to try.
Hi Sandy! I apologize for the confusion. The bread is baked on the baking sheet. The cast iron is on a lower rack and is only for the ice cubes - it helps create steam for the bread to rise. Happy baking!
Hello! I wanted to make a rueban, so made this! I was concerned about the lack of starch, so I made a few modifications, I ground all the grains finely using the wonder grain mill:
130g sorghum
125g brown rice
50g oatmeal
40g Teff (I didn’t have quinoa)
After grinding, I added 75 g tapioca starch.
Per other recipes I have had success with, I also added a glug of olive oil, and a teaspoon or two of cider vinegar.
I also didn’t have caraway, so did a t of fennel seeds.
I only did a single proof in a bread pan, and it was greatly over proofed! Will try again with two raises… we still made the Ruebens which were delicious, but the bread had the classic gap on top from being overproofed.
Thank you so much for sharing Megan! The added starch will likely cause it to rise faster/have a tendency to overproof. If you choose to add it again, you may have different rise times than indicated in the post :)
Hi, this sounds great! Are there any other GF flours that I could sub for the sorghum? I'm not allergic, I just don't have any in the house and am moving soon - would love to use up some of my existing flours, but don't want to create a gummy mess by using the wrong ingredients. Thanks!
Hi Amelia, I just moved as well so I totally understand :) It is always tricky altering GF recipes, but I think substituting half brown rice flour and half oat flour for the sorghum should yield pretty good results! Let me know how it goes!
First time making bread. And wow, it came out almost perfect. Crunchy crust and moist, not too dense crumb. It is impossible to tell that it's gf! I couldn't find quinoa flour so substituted brown rice flour. The flavor was awesome with a very slight bitterness. I actually kind of like it, but I wonder if that's what it's supposed to taste like. Thanks for this awesome recipe. I'm going to try your other gf bread recipes.
this bread has great flavor and the thick chewy crust. However i think i slipped somewhere as the rise structure is not like what is pictured. I would not call it dense but it could be better. i noticed that when i kneaded the dough was not sticky at all. All steps went as expected from this article. i wonder if i should add more water until the dough gets sticky or should i allow to proof more?
Hi Richard! Can I ask - what type of psyllium are you using? And are you measuring with cups or grams? This will help inform my answer!
i am using whole husk psyllium. specifically the NOW brand. i am measuring with cups. it is autumn now and the air is very dry here in chicago.
I often use the same brand of psyllium. I would try adding more water until the dough is a bit sticky, matching the consistency of the video in the post (it is a different version of this bread, but the consistency should be the same). Since cups are less accurate than weight, you might have to adjust the water each time you make the recipe. And spooning the flour into the measuring cup and then scraping off the excess will give you a better measurement as well. Please reach out if you have any more questions!
My second attempt was much better. I weighed ingredients instead of measured. I used a different brand of yeast and got the reactions that were described in the receipt. I also remembered to warm the bowl used to bloom the yeast. As a result i got a big loaf with a chewy crust but a soft center that holds the butter. My advice to others is to pay attention to the details that describe the results you should be getting at each step. They are accurate and a good sign if something is going wrong.
I am so glad to hear the second attempt turned out!
do you have a good receipt to use with the rye bread to make marble rye?
Hi Richard, I do not have a recipe. I would try making one batch of the Artisan Gluten Free Bread and a second batch of the Rye. Then after the first rise try shaping two loaves like you would a traditional marble rye and bake them both at the same time. You may have to adjust and perfect from there, but if I were baking a gluten free marble rye, this would be my starting point.
Thank you for this recipe! Turned out awesome first time I made it and have made it several times since. :) My gluten-eating family members like it too!