
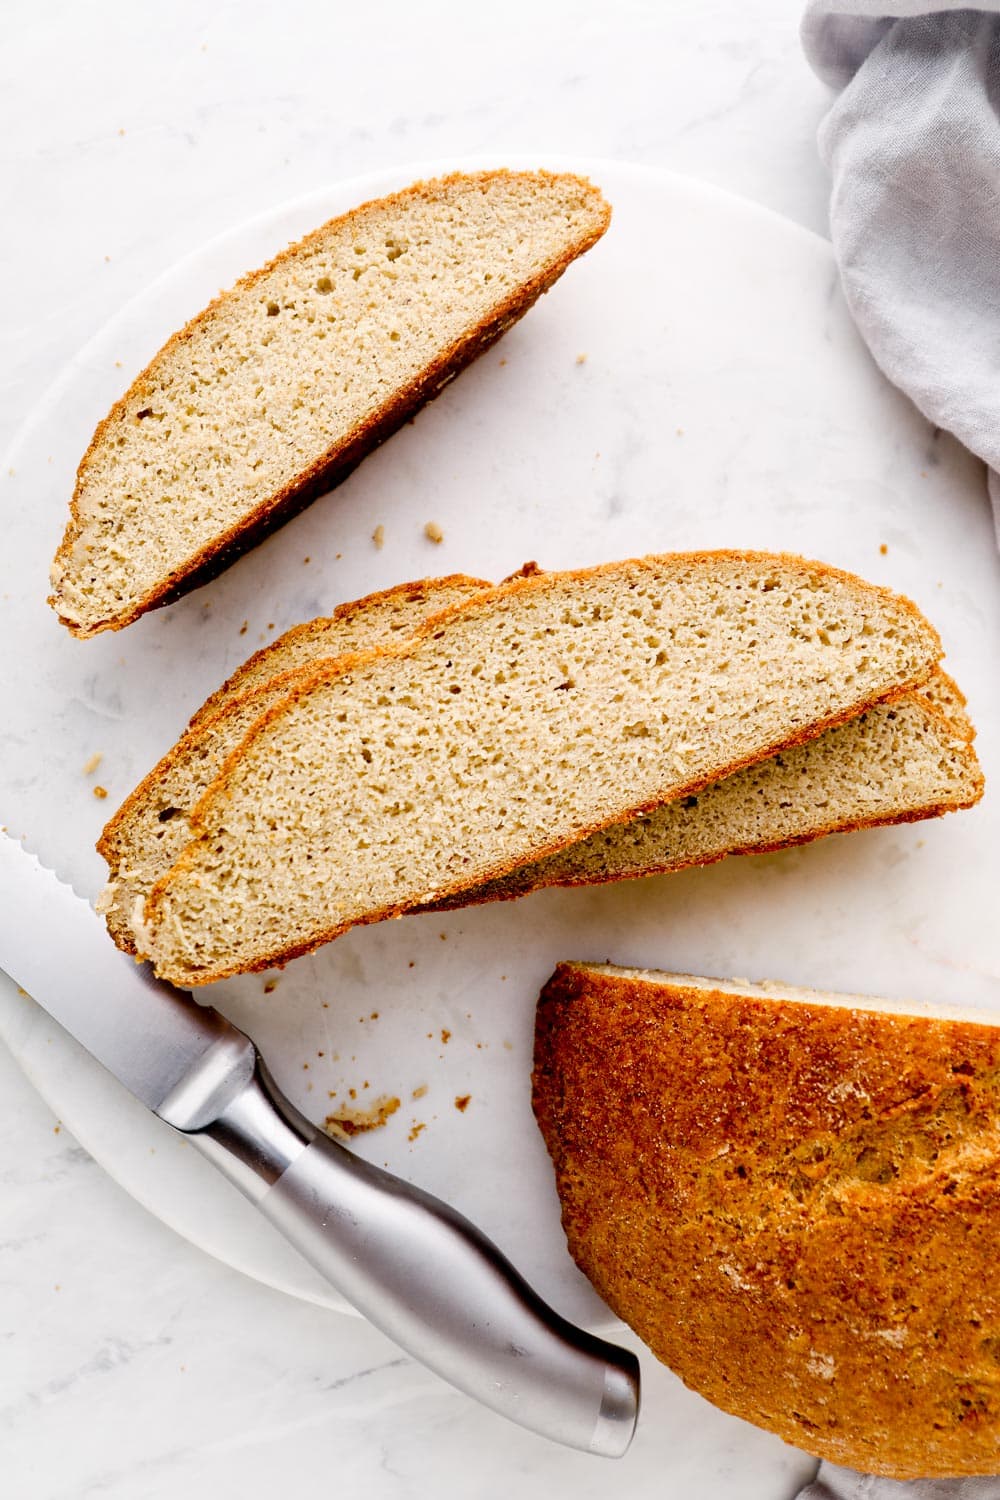
This Artisan Gluten Free Bread recipe is soft and chewy on the inside with a nice crusty exterior. 100% whole grain and made without starches, eggs, or dairy!

Meet the crowning achievement of my 6+ years of blogging: Artisan Gluten Free Bread.
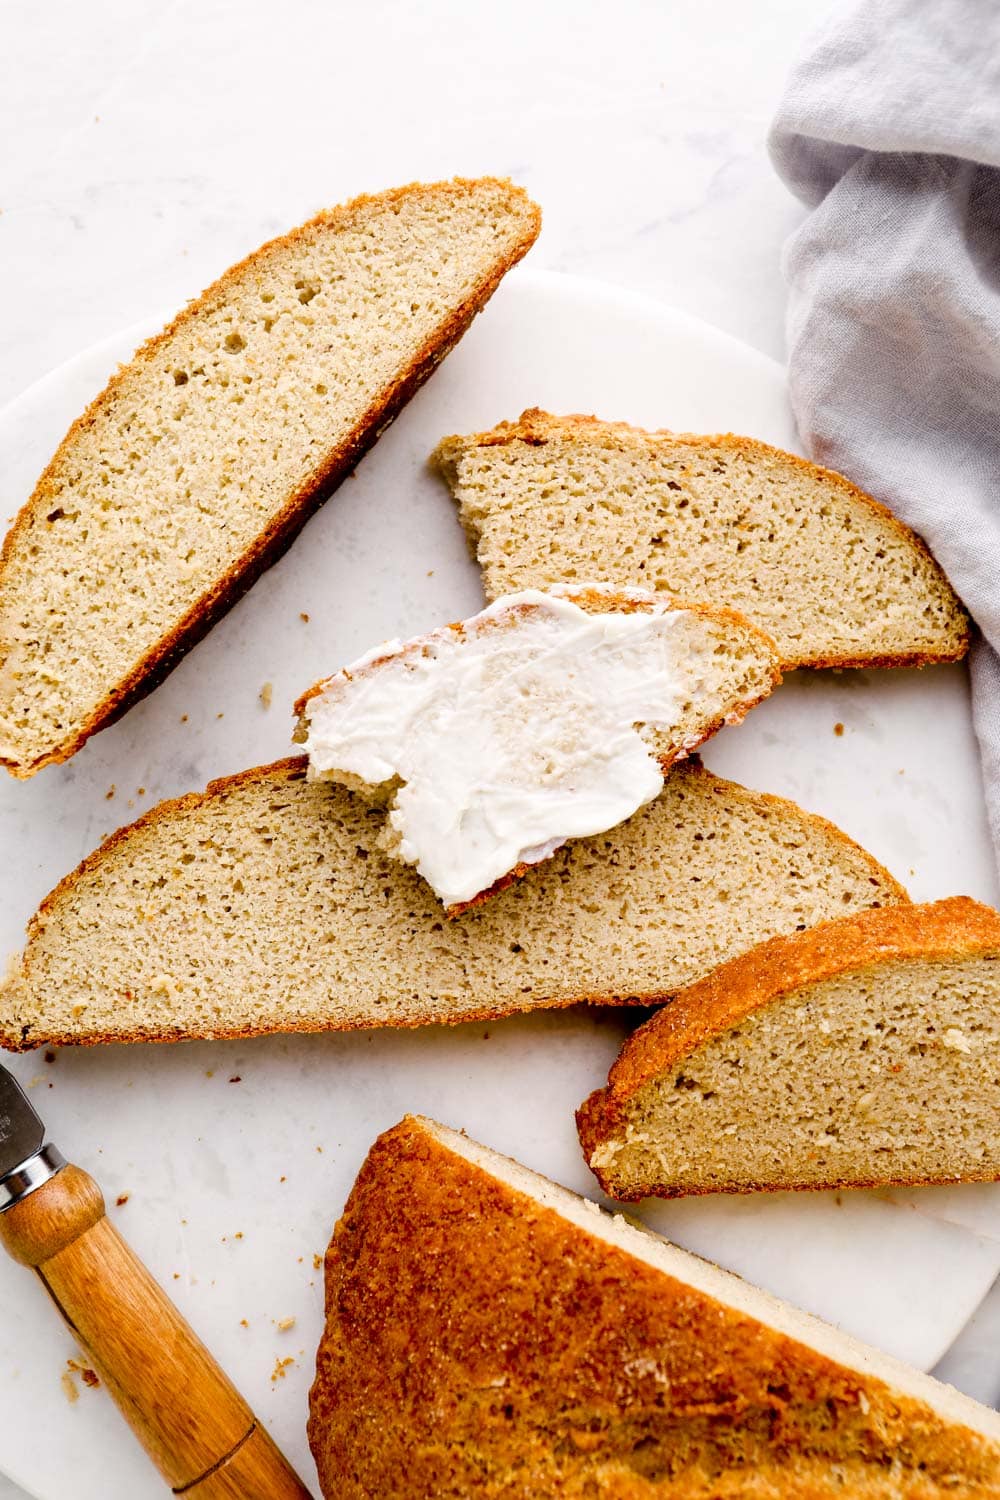
It is richly browned and crusty on the outside. The interior is soft and fluffy with a great chew. It has a sweet and nutty, whole wheat-like flavor. And when it's baking, the whole house is filled with the warm smell of fresh yeast.
It's the perfect compliment for any meal, soup, sandwich, or toast. Ready to top with nut butter or avocado and perfect for sopping up rich sauces.
If you miss baking bread or miss the taste of a good artisan loaf, this one is for you.
Reasons to love this recipe:
- This bread is made with 100% whole grains! It's the only gluten free loaf I've ever found that doesn't use starches or refined flours.
- It's also gum free. See ya later xanthan gum!
- It has the taste and texture of regular bread!
- Required only 7 ingredients and minutes of hands on time.
- It's vegan! No eggs or dairy to be found.

Ingredients you'll need:
- Sorghum flour
- Brown rice flour
- Oat flour
- Quinoa flour
- Warm water - between 105 and 110 degreed fahrenheit. I like to use this digital thermometer to make sure I get the temperature right.
- Maple syrup or honey - use maple syrup for vegans
- Active dry yeast - I buy it in bulk and store it in my freezer
- Psyllium husks - in their whole form, not powder. They give the bread an incredible texture and chew.
How do you make gluten free bread?
Mix the dry ingredients: I usually mix them together right in my stand mixer.
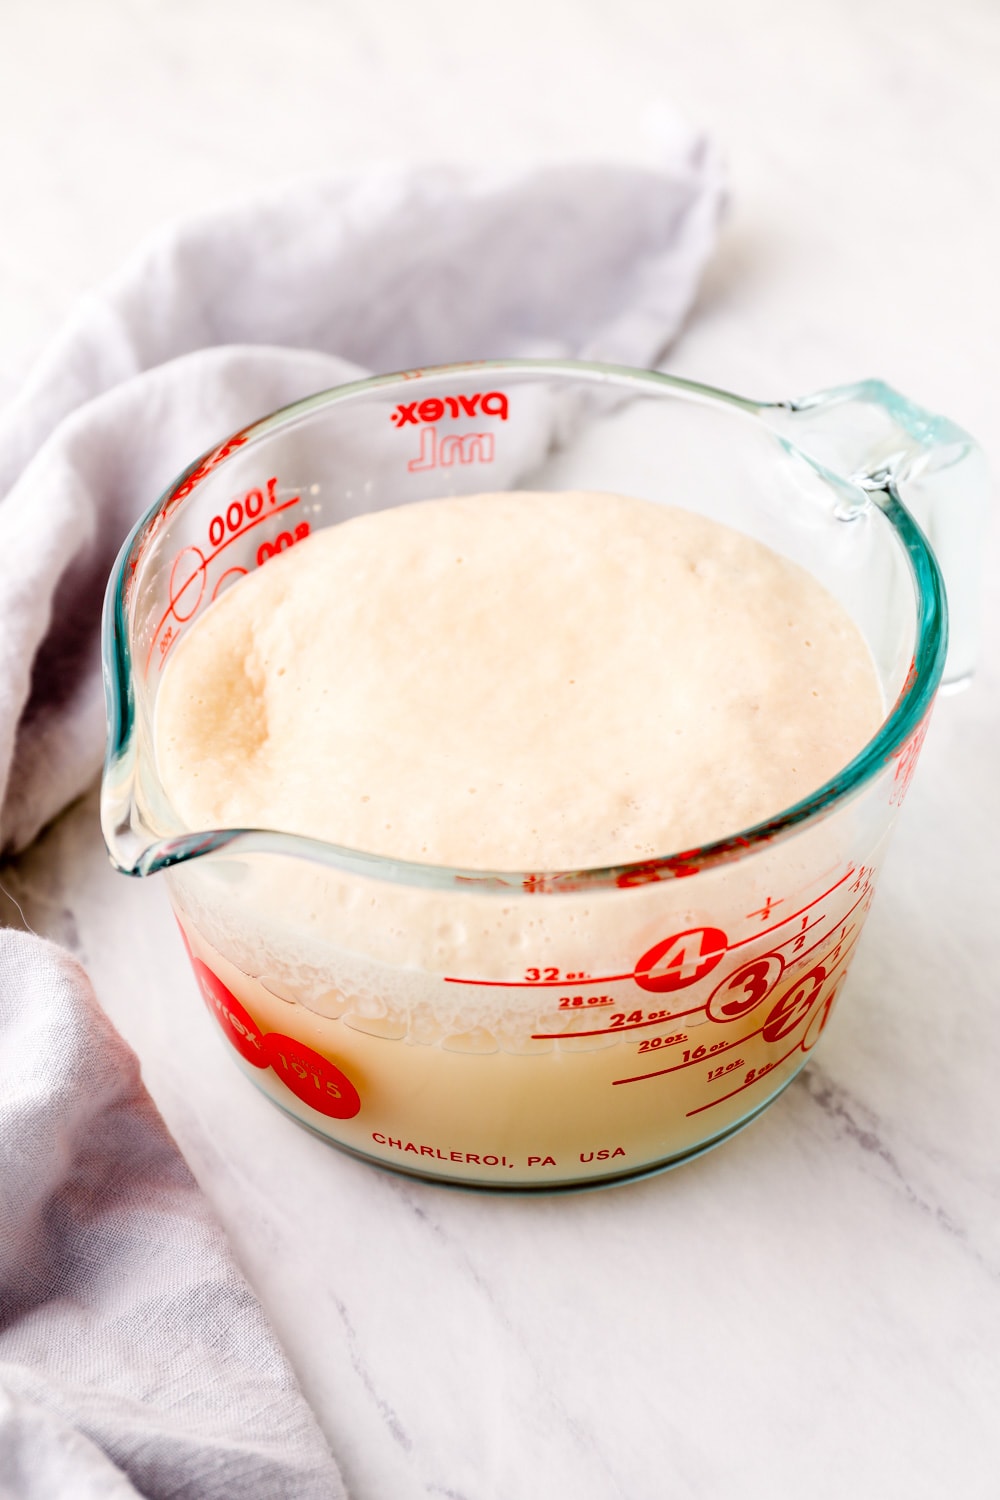
Bloom the yeast: Then, stir together the warm water, yeast, and honey or maple syrup. Set this aside for 10 minutes. The yeast should get nice and frothy. The froth lets you know the yeast is active and ready to go. If your yeast doesn't froth after 10 minutes. Try one more time and make sure the water temperature is correct. If it still doesn't froth, your yeast has expired. You'll need to get a fresh batch before making this recipe.
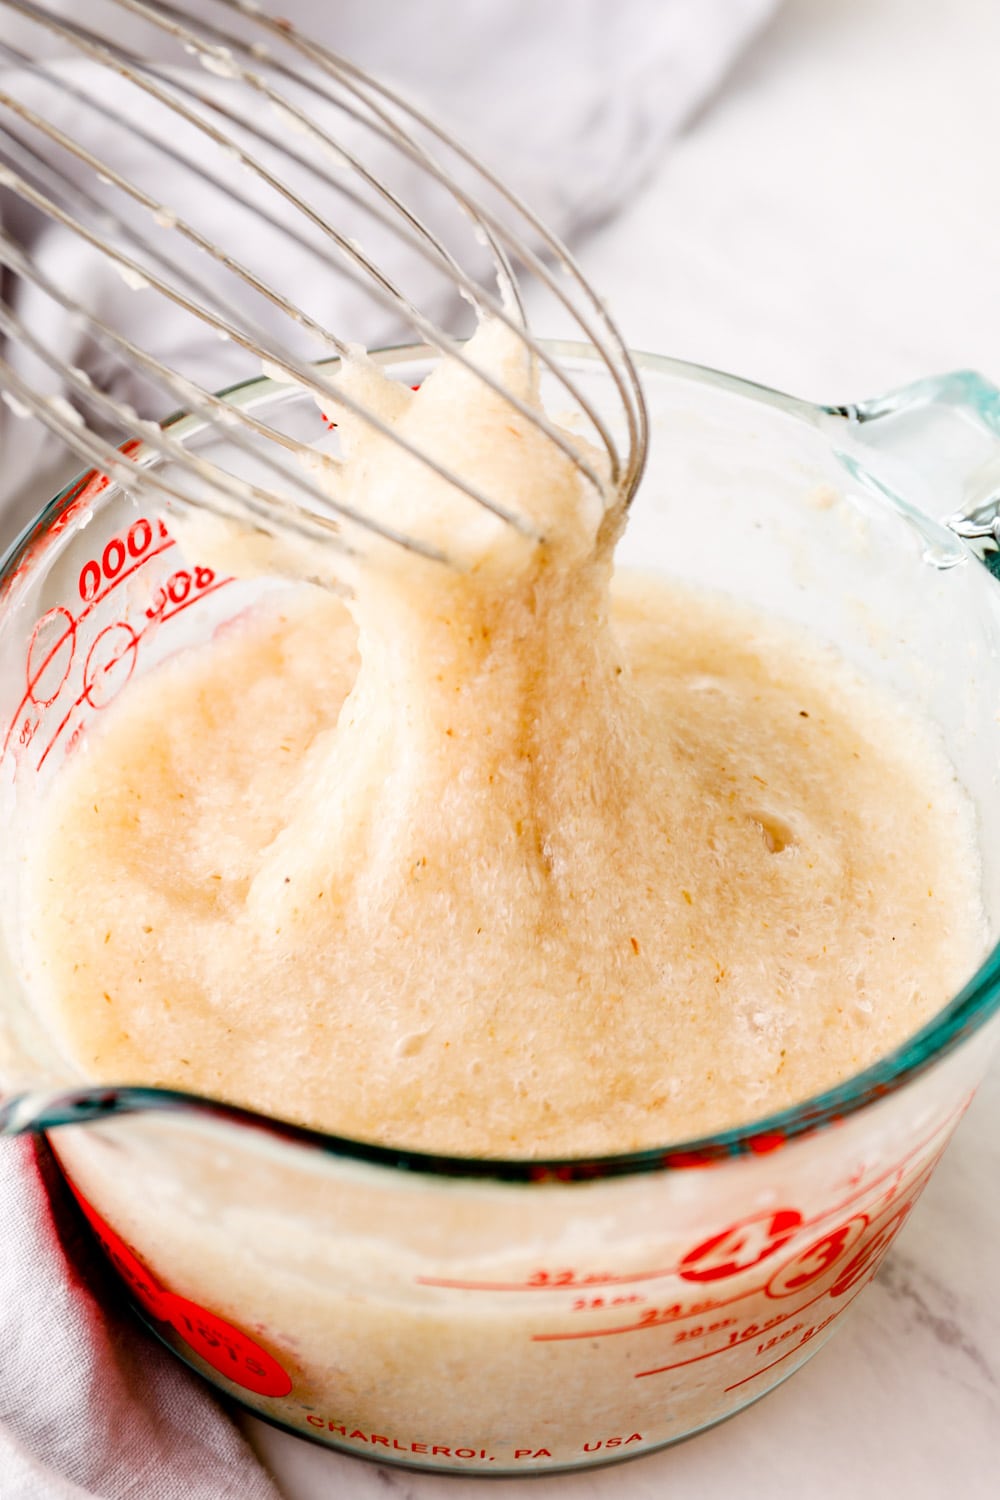
Gel the psyllium husks: Stir in the psyllium husks and set aside for another 5. They will thicken and create a gel-like consistancy.
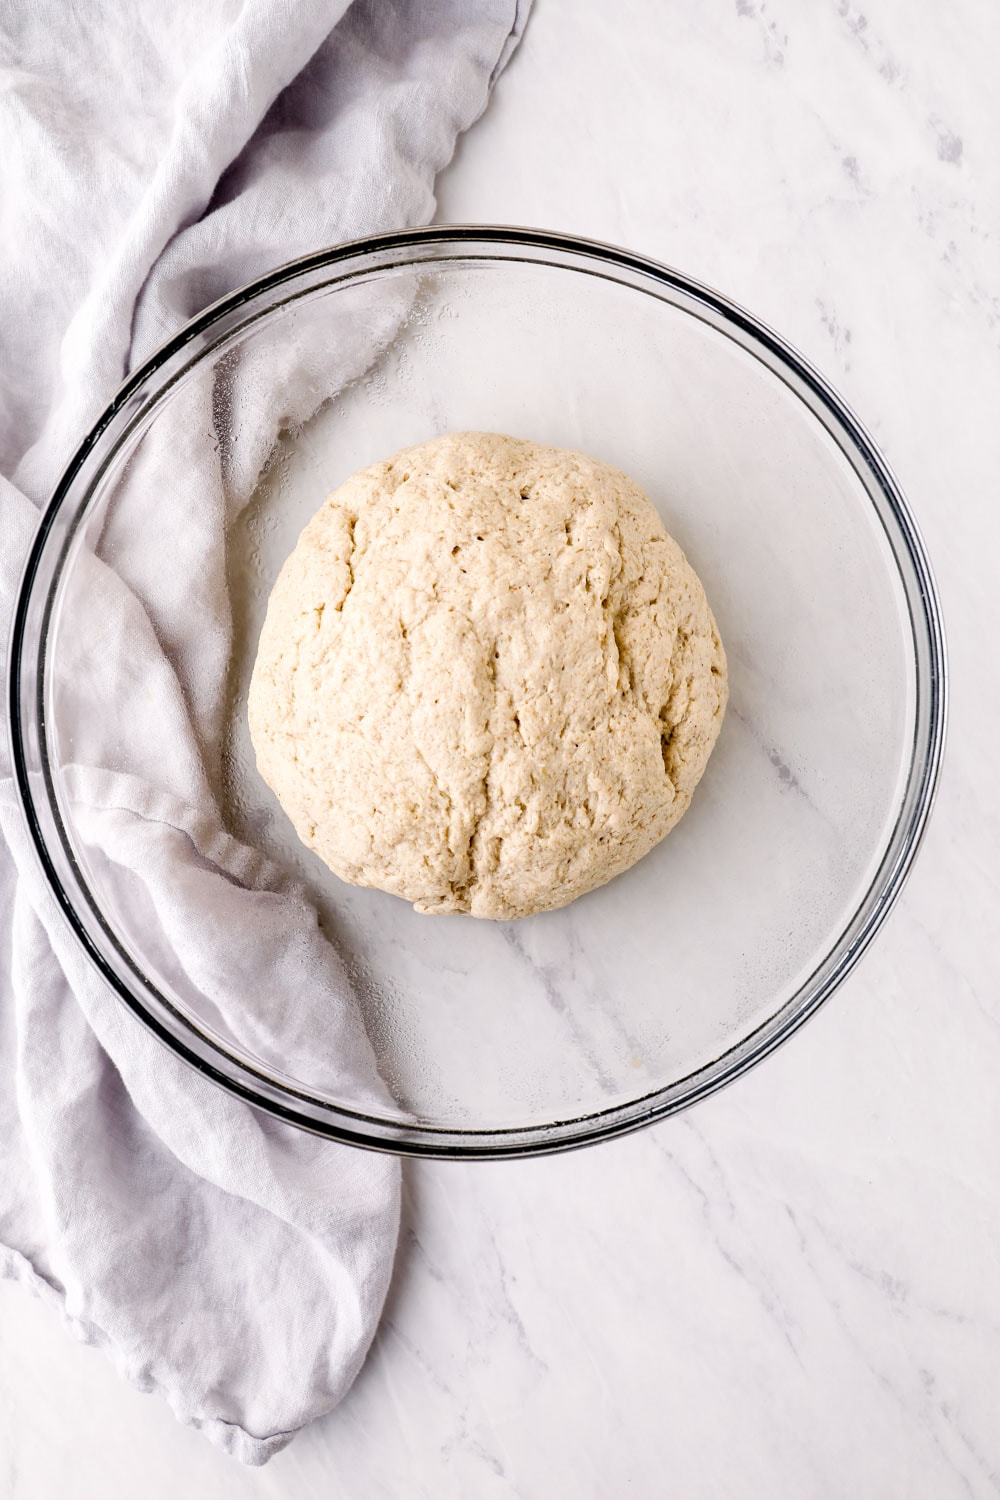
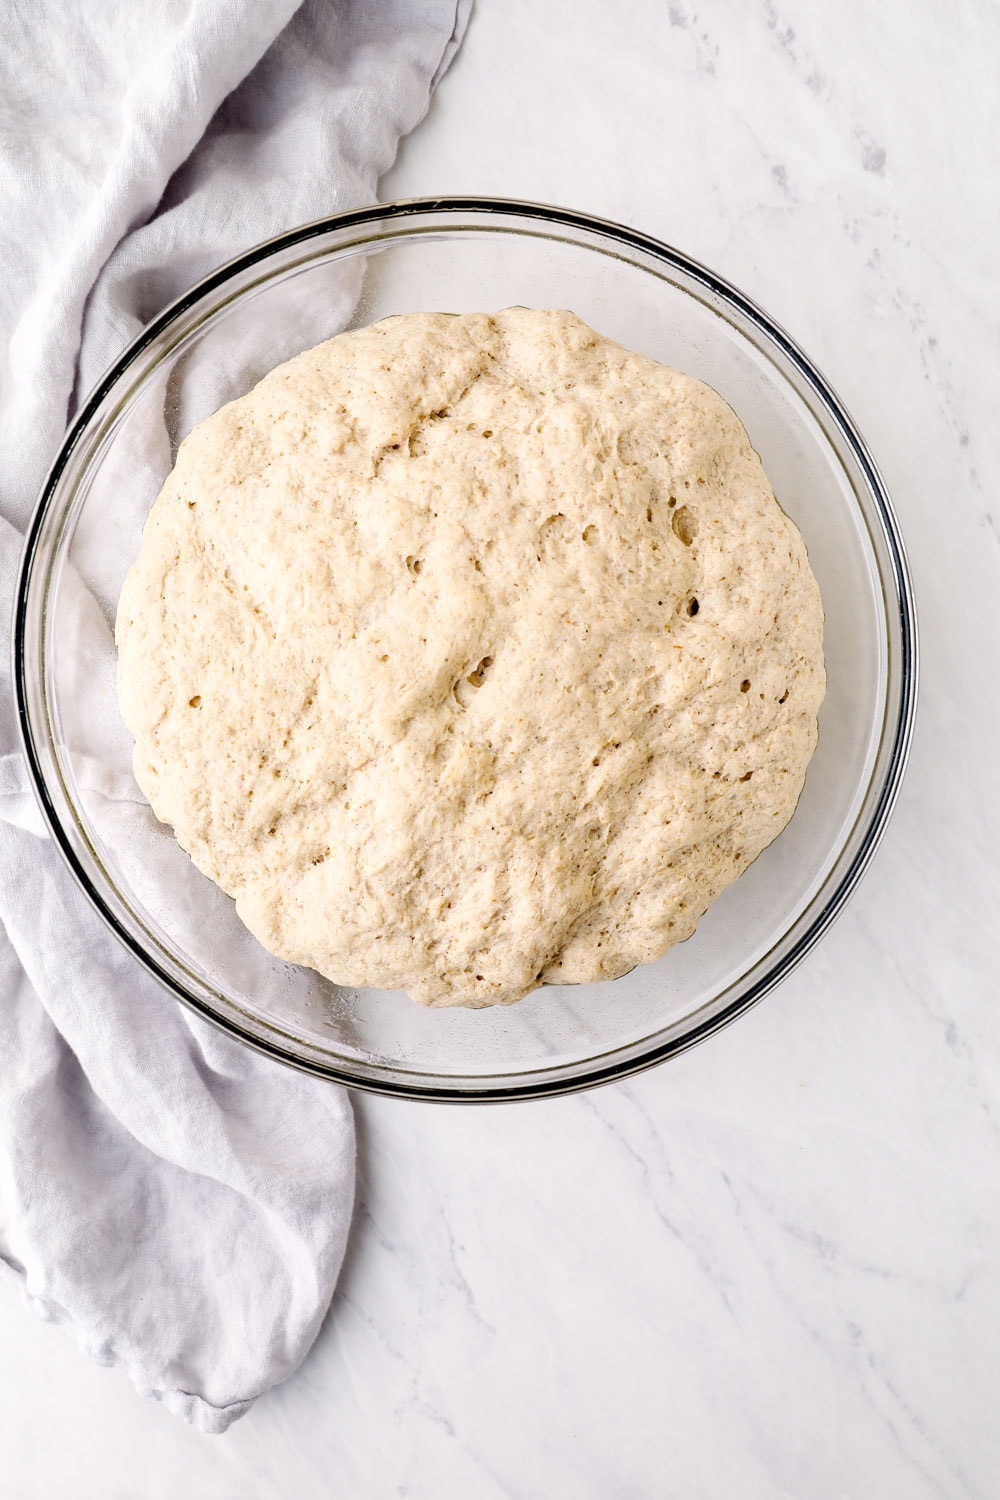
Mix and rise #1: Add the wet ingredients into the dry and mix on medium speed until combined. Shape the dough into a ball, place in an oiled bowl and let rise for 1 hour.
Preheat and prep the oven: If you have one, place a baking stone on the lower rack. The stone helps maintain an even oven temperature and a more even bake on the bread. On top of the stone, place a cast iron or baking dish. Preheat the oven to 400 degrees.
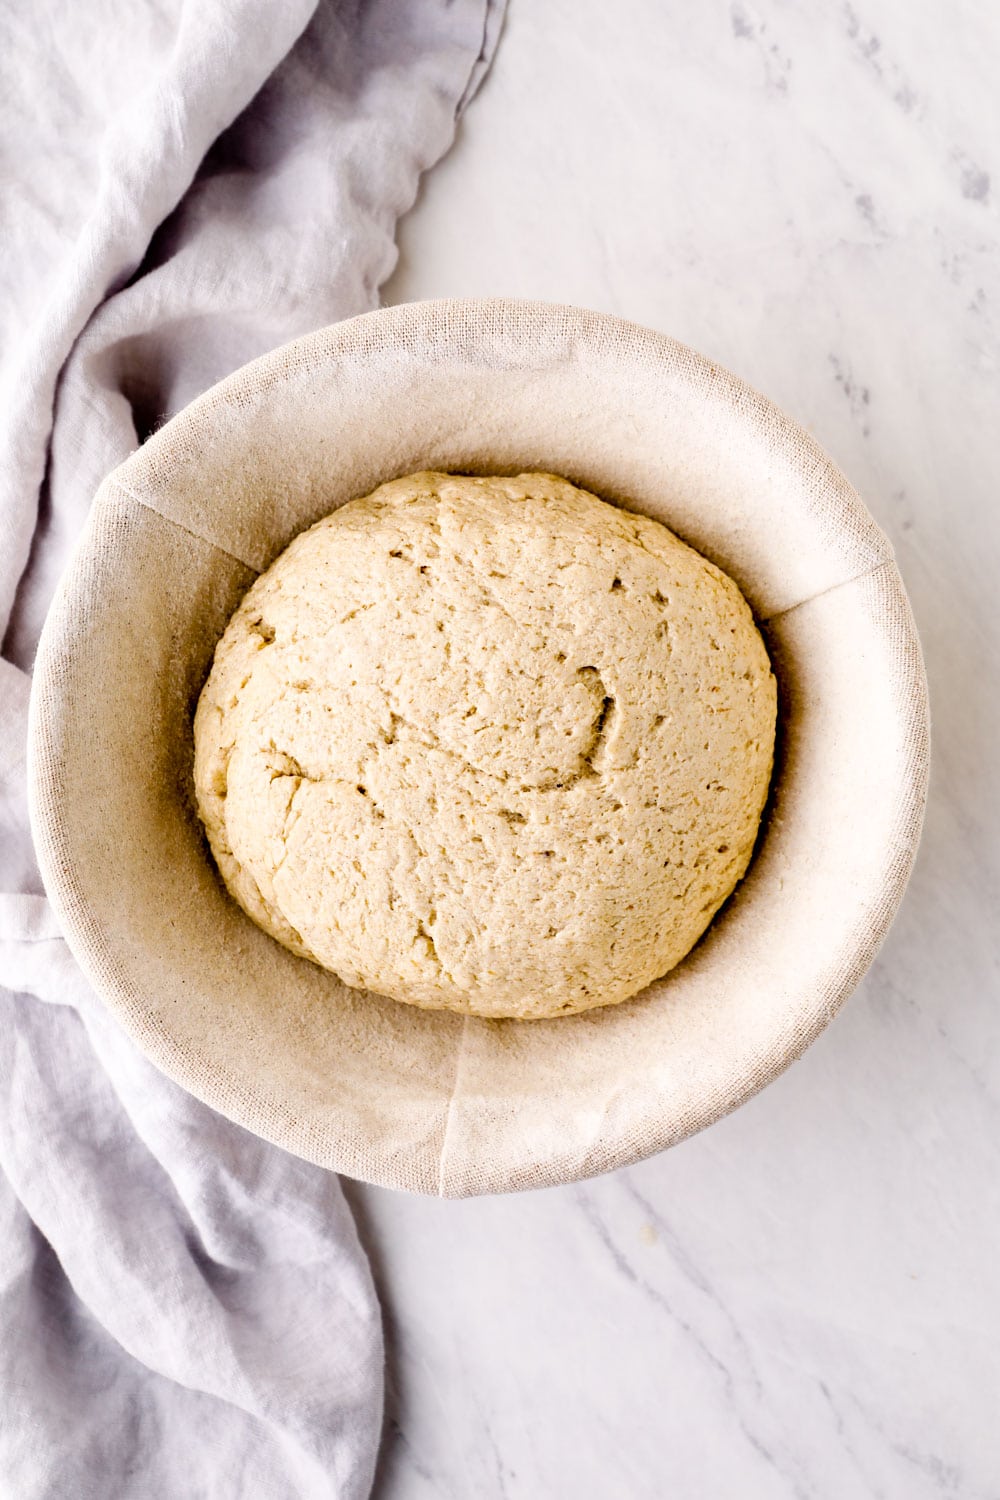
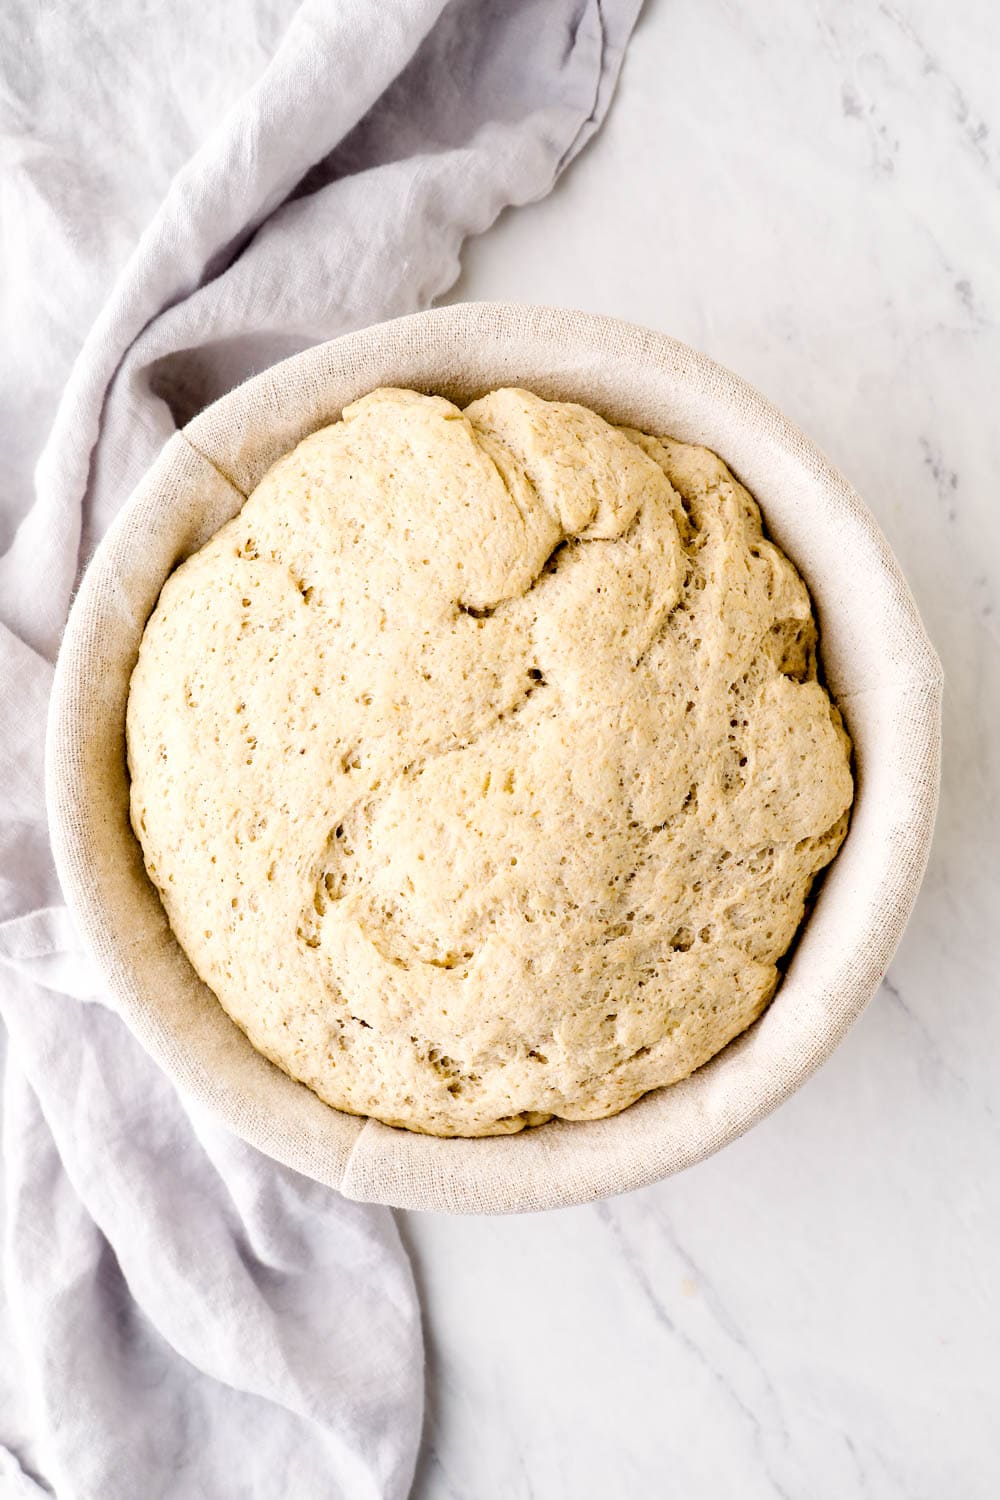
Rise #2: Once risen, kneed the dough, form into a ball again, and place in a proofing basket. Let rise for another 45 minutes. Alternatively, you could let the bread rise again in the same bowl, but the loaf will be shorter and squatter. The proofing basket helps create a tall, well shaped, loaf - and they are super affordable!
Bake: Gently tip the dough onto a sheet pan. Spray the top of the bread with olive oil. Score the top of the bread with an X using a lame or very sharp knife. Fill a drinking glass with ice cubes and add them to the cast iron or baking dish. Quickly transfer the bread to the oven and bake for 55-65 minutes. Let cool completely on a wire rack. Enjoy!

Variations
This bread recipe is just the beginning! Take this base recipe, add a few ingredients, and we have a whole new load of bread. Try some of these fun variations below!
Gluten Free Olive Bread
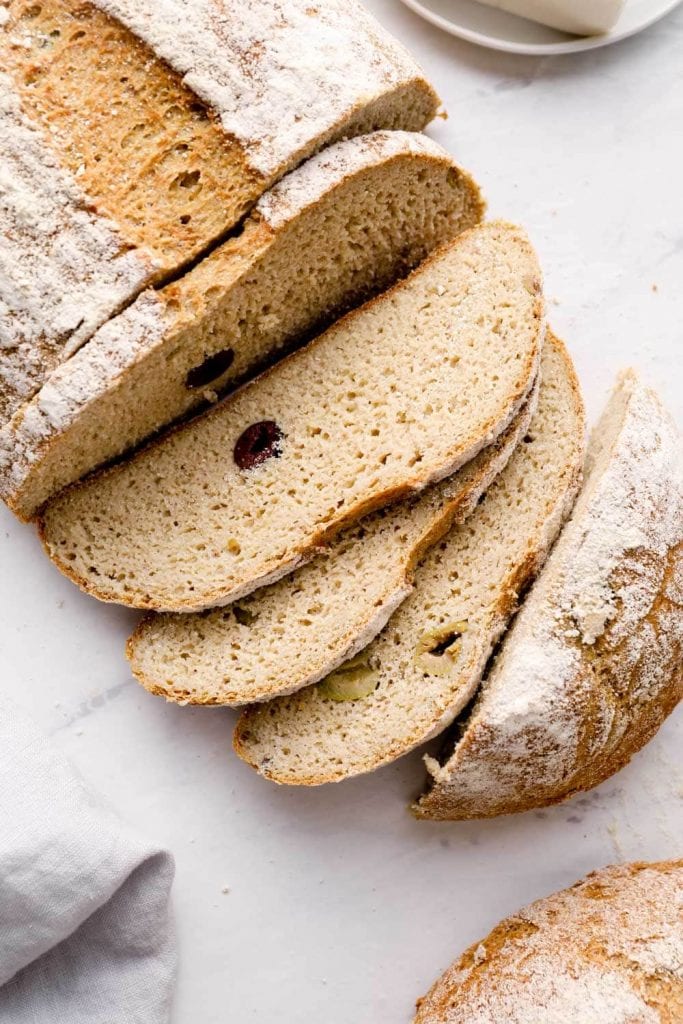
Gluten free olive bread is a favorite spinoff from this base artisan bread recipe. It has the same richly browned chewy crust, soft and fluffy interior and sweet and nutty, whole wheat-like flavor. But this loaf is studded with salty olives!
The perfect compliment to Italian dinners, soups, and cheeseboards.
Gluten Free Cinnamon Raisin Bread
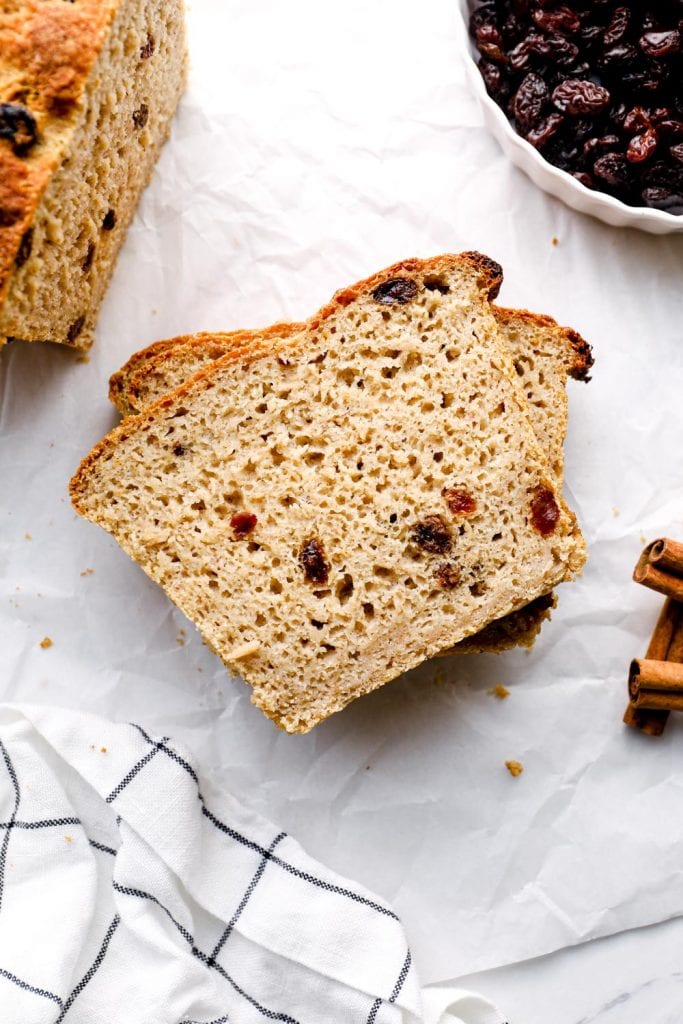
This Cinnamon Raisin version has the same soft interior, golden crust, with a slightly sweeter dough, juicy raisins and warming cinnamon.
A breakfast classic best toasted or room temperature with a good smear of butter.
Honey Oat Bread

This extra special loaf is studded with chewy oats and has a sweeter flavor thanks to some extra honey in the dough.
This slightly sweeter loaf makes amazing toast, sandwiches, and french toast, but I can’t stop eating it freshly sliced and spread with vegan butter.
Rye Bread

This gluten free loaf is flavored with caraway seeds and molasses for traditional rye flavor! It's also made with a blend of gluten free flours that keep this loaf light and fluffy, mot dense as some rye loaves can be.
FAQs:
What are psyllium husks?
Psyllium husks are the husk from the plant Plantago ovata's seeds. It is a whole food and is most commonly know for it's use as a fiber supplement. But is also has incredible applications in gluten free baking! When added to water, psyllium becomes a thick gel. So, it takes the place of gluten and helps to bind the bread together, give it elasticity, and chew while preventing it from becoming crumbly.
Can I substitute any ingredients?
Short answer: no.
The flour, water, yeast, and psyllium ratios are set in stone. Each flour in the recipe has a different absorbency rate. Meaning, each flour absorbs more or less water. Substituting one flour for another would break this perfect ratio and result in a loaf that is either dense and hard or gummy and soft.
The one ingredient that you can safely swap is the maple syrup of honey for any other liquid sweetener of your choice.
Do I need a proofing basket?
You can technically make this bread without it, but using a proofing basket creates a much better loaf! It helps the bread rise up instead of out. This is the affordable one I use!

What if I don't have a baking stone?
That's okay! Proceed with the recipe without it. The baking stone sits on the lower rack of the oven. It retains heat and helps to maintain an even oven temperature. Using it does produce a slightly better loaf, but the bread is still delicious without it.
If you're looking to purchase one, I like this affordable option.
What's with the cast iron pan in the bottom of the oven?
It's all about creating a great crust on our bread! Before you preheat the oven, place a cast iron pan (preferred) or a metal baking pan (if you must) on the lower rack. Preheat the oven with the pan in place so that it gets nice and hot. When it's time to bake the bread, throw a handful of ice into the cast iron pan to create steam. This steam helps form a beautiful golden brown crust.
Should I use a scale to measure ingredients?
If you can, YES! This creates the best and most consistent result. However, cup measurements are included if you don't have a scale.
This is the scale I use. It is super reliable and you can't beat the price!
What if I don't have a stand mixer?
If you don't have a stand mixer, you can still make this recipe. Whisk the dry ingredients together in a large bowl. When you add in the liquid, stir it together with your hands, kneading as necessary to fully incorporate all the flour into the dough.
What is a lame?
A lame is a double sided blade that is specifically designed for slashing the tops of bread before baking. A lame makes the job a little easier, but it's not entirely necessary for this recipe. You can also use a very sharp knife.
For those curious, here is the lame I use.
More gluten free bread recipes to try:

Artisan Gluten Free Bread
- Cook Time: 180 minutes
- Total Time: 180 minutes
- Yield: 12 slices 1x
- Category: Sides
- Method: Oven
- Cuisine: American
- Diet: Gluten Free
Description
This Artisan Gluten Free Bread recipe is soft and chewy on the inside with a nice crusty exterior. 100% whole grain and made without starches, eggs, or dairy!
Ingredients
Dry ingredients:
- 125 grams (1 cup) gluten free brown rice flour
- 130 grams (1 cup) gluten free sorghum flour
- 90 grams (1 cup) gluten-free oat flour
- 75 grams (½ cup) gluten free quinoa flour
- 6 grams (1 teaspoon) sea salt
Wet ingredients:
- 2 ½ cups warm water, between 105 and 110 degrees
- 10 grams (1 tablespoon) active dry yeast
- 2 tablespoons maple syrup OR honey
- 30 grams (½ cup) whole psyllium husks
Instructions
- Whisk together all of the dry ingredients in the bowl of a stand mixer. Fit the mixer with the paddle attachment.
- In a bowl, whisk together the water, yeast, and maple syrup. Let sit for 10 minutes. The mixture should be frothy and smell of warm yeast. (If the mixture is not frothy, the yeast is expired and the bread will not rise. It is best to start over with a new batch of yeast.)
- Whisk in the psyllium husks, making sure there are no clumps. Allow this mixture to sit for 5 minutes, until thick.
- Add in the wet mixture to the dry. Mix on medium speed until well incorporated and the dough forms a loose ball.
- Remove the dough from the mixer and kneed a few times on an oiled surface. The dough is very sticky, so you might find it helpful to oil your hands, too. Form the dough into a ball by tucking the sides underneath until it is round. Place in an oiled bowl, seam side down.
- Cover with a towel and let rise in a warm, even temperatures place for 45 minutes to an hour. The dough should double in size.
- Once the dough has risen, kneed a few times on an oiled surface. Once again, form the dough into a round ball by tucking the edges underneath. Return to the bowl, this time seam side up. Let rise for 30-45 minutes, or until the dough has doubled in size.
- While the dough is rising, place a cast iron skillet on the lower middle oven rack. Preheat the oven to 425 degrees. You want to let the oven preheat during the entire second rise. This ensures that the oven is at an even temperature when baking the loaves.
- After the second rise, line a baking sheet with parchment paper. Carefully tip the bread out onto the baking sheet. Using a sharp knife, make a few shallow cuts in the top of the bread.
- Add a cup of ice to the cast iron and immediately add the bread to the upper rack, and quickly shut the oven door. Bake for 50 minutes. Remove from the oven and let the bread cool completely on a wire rack, several hours, before slicing.
Notes
The oat flour can either be purchased at a health food store or made by grinding gluten-free rolled oats in a blender until a fine flour forms.
If you don't have a stand mixer, you can still make this recipe. Whisk the dry ingredients together in a large bowl. When you add in the liquid, stir it together with your hands, kneading as necessary to fully incorporate all the flour into the dough.
Nutrition
- Serving Size: 1 slice (1/12th recipe)
- Calories: 141
- Sugar: 2g
- Sodium: 198mg
- Fat: 2g
- Saturated Fat: 0g
- Carbohydrates: 29g
- Fiber: 4g
- Protein: 4g


This is the absolutely the best gluten free bread I have ever eaten! Thank you for letting me be a taste tester. I am so glad to finally get the recipe so I can bake this for myself.
I am SO thankful that you were my taste tester!
Good morning. Any chance you have tried this with a different flour other than oat? Or a suggestion on replacing oat. I can't eat oat products (even GF ones) or do you have a similar recipe without the oats all together. I love that it's egg free as that's an allergy as well. Thanks!
Hi Tara, great question! Unfortunately, I do not have any recommended substitutes for the oat flour that I have tried and tested myself. If you want to try anyway, I would recommend replacing it with the same weight of sorghum flour, but I haven't tested it myself so I can vouch for results. If you do give it a go, please let me know how it turns out! Happy baking :)
If you ever get to the point that you can tolerate potatoes, then you could use potato water in your bread. The bread will last longer that way. A natural preservative. Good luck!
Thank you, Karen! I'll have to give that a try :)
Hi, I have tried making this bread several times and each time my dough did not rise (leaving the bread quite dense). I tried following each step quite closely- don't know what I an doing wrong. Help!
Hi Farzana! I am sorry you are having trouble! The bread definitely isn't light and airy, it's more of a dense whole grain loaf but I am happy to help track down what could be causing you the problem! Are you using the same exact flour combination? What type of yeast are you using? Are you baking at a high altitude?
Hi Lauren, thank you for responding, sorry I did not see it and did to reply back. Since August I have been making this bread and it has turned out perfectly. Since last month, I have changed my oven from an electric one to a gas one. Since then, my bread rises beautifully but is hollow inside and gummy and dense in the bottom. I revisited your blog again and you mention a baking stone. What is its role?
Hi Farzana, I am glad that you had success for so long, but am sad to hear otherwise! Bummer! My guess is that your new oven bakes at a warmer temperature than your old oven. A hot oven would make the bread rise faster, but cause the middle to be underdone. Even though you are preheating to the same temperature as you did with your old oven, ovens can vary a surprising amount in actual internal temperature. I would get an oven thermometer like this one, and preheat the oven and then see what the actual internal temperature is. Once you know how much your oven varies from the temperature on the recipe, you can adjust accordingly.
Baking stones can help to regulate the temperature of the oven, and help to give the bread a better bottom crust, but I would bet your problem is the oven temperature. The baking stone wouldn't vary the results that much, and especially not if you were having success without it before. Let me know how it goes for you!
Stumbled across this while searching for gluten-free, starch free, egg free, baking powder free......wondering if that is possible... bread! This looks amazing! Can't wait to try it.
Hi Ginger, I am so glad you like it :) When I realized that I could eat fresh bread again, I was in seventh heaven. Please let me know how it turns out for you! I have helped a few people perfect the recipe at different altitudes and with different oven temperatures. So if you need any assistance, just give me a holler!
Thanks! I have everything now to make it. (Except the baking stone ). I plan to try it very soon. Does it work on a cookie sheet? Have you tried it in a loaf pan?
I have made it on a baking sheet with okay results, but it didn't turn out well in a loaf pan. Happy baking!
This bread looks amazing! I've been looking so long for a gluten free bread that has oat flour (I LOVE oat flour) but no starch. Would it be possible to make this in a bread pan for sandwich bread?
Hi Clara, I can't say I had great success in a loaf pan, but I will sometimes shape the dough into a square log instead of two rounds for sandwich bread! Nothing beats a good sandwich :) Oat flour is absolutely my favorite!
Hello, I am allergic to gluten AND quinoa. Based on your experiments do you think this recipe would still work well without the quinoa flour, and is there one of the others flours you'd recommend bulking up as a substitute?
Hi Ana, Being intolerant to so many things myself, I so wish I had an easy fix for you! I am afraid that the quinoa flour plays a big role in this bread. It is a highly absorbent flour and without it, the moisture level will be thrown off. Have you ever heard of Artisan Bread in 5 Minutes a Day? They have come out with a gluten-free version of their book and posted their main bread recipe online. I just double checked that it was free of quinoa flour. It might be worth a try! I have made it many times, and can vouch for how good it is. Here is the link: http://www.artisanbreadinfive.com/2014/11/03/master-recipe-from-gluten-free-abin5
Happy baking!
Laurel
I was just getting ready to ask the same thing and saw your question posted. You’re the first person I’ve met, besides me that is allergic to quinoa!
I just mixed up the dough for this bread and I need some clarification about the chia seeds. The recipe states "1/3 cup chia seeds, ground into a powder." So, I took 1/3 cup chia seeds, ground them into a powder, and added all of it to the recipe. (I didn't measure, but the powder that resulted was significantly more than 1/3 cup.) When whisked in with the remaining wet ingredients it seized up immediately, and when I then added that to the dry ingredients the result was unmixable. I ended up adding an additional cup of water, and it was still quite stiff. It's rising now, so I don't yet know how it will turn out, but I am wondering now if what you meant was "1/3 cup ground chia seed powder" rather than "1/3 cup chia seed, ground to a powder." That little comma changes the meaning and, obviously, the results. Remember: Punctuation saves lives! ("Let's eat, Grandma" vs. "Let's eat Grandma.") So, please tell me which it is -- 1/3 cup ground chia seed powder, or 1/3 cup chia seed, ground to a powder. Thank you!!!
Hi Anna, Yes, the recipe should read: 1/3 cup chia seeds, ground into a powder. You want to measure out 1/3 cup of whole chia seeds and then grind them into a very fine powder with a coffee grinder. This can result in more than 1/3 cup. The mixture should thicken up, and be a gel like consistency, though it should take about 5 minutes to do so. It is a dough that hard to mix, that is why I recommend only using a KitchenAid or other stand (not hand) mixer for this recipe. The thickness of the dough really helps to give the gluten-free bread its structure.
Were your psyllium husks a fine powder or in their whole form? For this recipe, they should be in there whole form and not the powdered variety. This makes a huge difference in the thickness of the mixture. I tested the recipe both ways and powdered psyllium husks do not work. They create a similar problem to what you are describing. I would check your psyllium husk package to see which type you are using.
If all your ingredients are correct, I would recommend you power through with the recipe as written and resist adding in any extra water. It is a thick dough, but that is what gives it structure and allows it to keep its shape while baking. Gluten-free baking is quite touchy and adding in extra ingredients can really throw it off and create an inedible loaf. If you continue to have problems you can always email me at [email protected].
I do hope this recipe ends up working out for you! It is one of my favorites. Happy baking! :)
Laurel
Hi Laurel. I've been looking for a brown rice and chia recipe, and came across your site. I would like to make this recipe but I don't do well with sorghum. Do you think the recipe would work well if I eliminated it and used an extra 1/2 cup each of brown rice and oat flour, or a cup and a half of quinoa flour? I realize you may not know, and I am willing to try it regardless. But I thought I would see if you had an opinion on it first. And, I would prefer not to use as much yeast; do you think this would respond well to a slow rise method, such as in a "no knead glutenous bread", where the bread would rise between 12-24 hours, with only 1/4 tsp of yeast?
Any input would be appreciated. Thank you!!
Hi Anita! Sorry for my delayed response. I was out in the boonies of Montana without an internet connection for Thanksgiving. I think that substituting the sorghum for brown rice and oat flour would work the best. Quinoa flour is a highly absorbent flour and would soak up too much of the liquid and make the bread dense and dry. The recipe does call for a lot of yeast, partially because without it, gluten-free bread is so dense. I have had a few gluten-free bread recipes that use the slow rise method, but I wouldn't know if it would work with this loaf. I would hate for you to try it and waste all the ingredients if it didn't work out. I often make bread from the book Gluten Free Artisan Bread in Five Minutes a Day. They are all slow rise breads and many of the recipes are vegan. Honestly, I make their bread more that I do my own recipe. If you wanted to try their bread without buying the book, I found that they have one recipe for free online! If you do tinker with my recipe, let me know how it turns out! Happy baking :) - Laurel
I can't rave enough about this bread recipe!!!!!!! It is FANTASTIC!!!! My kids love it too, it has become a daily staple. Thankbyou for your fabulous work!!!
Thank you so much for your kind words, Carol! I am so happy that your family is loving this recipe!
Hi,
I’m allergic to psyllium husk, but I’m really attracted to this recipe. Could I subsitute with flax?
Hi Jojo, I don't think so. The psyllium husk is essential in getting the bread to hold together and have the correct texture. I also love the book Gluten Free Artisan Bread in 5 Minutes a Day for baking bread. I know their recipes are free of psyllium husk! I would feel better pointing you in the direction of a bread that I know will work for you rather than having you experiment with this loaf and potentially have to scrap the recipe - gluten free flours can be expensive! Happy Baking!
This was absolutely delicious, Laurel! Thank you so much for all your trial and error, and for graciously sharing it! Being a Vegan 8 groupie :) I’m used to measuring everything in grams instead of cups so I wasn’t sure which method you used when making this recipe. I decided to use grams since every flour in your recipe calls for different grams in a cup and it worked out great. I made 2 baguettes and will try circular loaves next time. I sprinkled sesame seeds on top and think you could use sunflower or pine nuts and it would be equally as fabulous. The one thing I wondered is how you easily transfer the loaves from the counter to the hot stone. Even though they’re on parchment they’re heavy and although I had them on a metal pan it was hard sliding the parchment and loaves in a hot oven. I figured you might have a trick I didn’t think of. Thanks again Laurel!!
Hi Colleen! I am so glad you are enjoying the recipe! Since you have a scale, I think grams are the way to go :) I actually use a pizza peel (like this one) to slide it onto the stone. I spread some course grind cornmeal onto the pizza peel so that the bread slides off easily and then place the loaf right on top of the cornmeal. I touch the edge of the peel to the baking stone and give it a good shake to slide it off. It's definitely the easiest method I have found. And I will definitely be trying the pine nuts! That sounds absolutely delicious!
Can I make this (or even bake this) in my bread machine?
Hi Lucy, I haven't tested this in a bread machine, so I can't give you a firm yes. I think it should work, but I can't offer any advice for the particular settings, etc. If you do give it a try, I would love to hear how it turns out!
Can I use this bread to make sandwich and can we fry it to make potato bread roll?
Hi Macro, I am not sure what a potato bread roll is so I can't say without more information. As far as sandwiches go, yes! It makes delicious sandwiches. The bread is a bit smaller (as with all gluten free bread) so I often like to enjoy the sandwiches open faced. Happy cooking :)
Laurel, I'm very excited to try this recipe, but am living in a country where the flours aren't available. Can they all be ground in my blender the way the oats can?
Hi Don, Great question! To my knowledge, yes. I haven't tested this out myself, but as long as the grains are ground down to a fine flour they should work in the recipe. Happy baking!
Thank you, Laurel! I'll be trying this soon.
Thank you, Laurel, for this wonderful recipe!
I've made it twice now, and a success both times. Flavor and texture are both excellent. Both times both loaves vanished in record time, and I cook for a picky eater.
This is one of only two wheat-free bread recipes I've been able to find that aren't at least 30-60% refined starch. Congratulations on your achievement!
One minor problem with my loaves: the boules spread out flatter than yours, so they look like enormous cookies. I found this dough bakes well in 5x9 bread pans, and that makes a more practical shape.
Perhaps next time I'll use a little less water, or replace some with egg. I'm in the mountains at 5000 ft elevation, so I increased the temp to 400f and still wound up baking for 75-85 minutes.
All the flours were ground in my blender. My only substitution was brown rice for white.
Hi Don, I am so glad to hear you are enjoying this recipe! It tends to vanish quickly around my house, too :)
The bread pan sounds like a great fix! My thought is that possibly the blender ground flours are a bit larger in size than milled flour. Because they have less surface area they might not be absorbing as much liquid. Quinoa flour happens to be especially good at absorbing water, so you could try increasing that a few tablespoons at a time and see if that helps solve the problem.
I also think tinkering around with the water content and addition of egg could be great fixes too :)
Please keep me posted on your progress if you have the chance! I would enjoy hearing how the changes work at elevation.
Thank you again, Laurel!
I increased the quinoa flour to 3/4 c, and my boule looked like yours, higher and less wide. I strongly suspect you're right about my homemade flour being coarser than yours and imbibing less.
Before that change, my dough reminded me of the terrible special effects in the classic 1958 "horror" film "The Blob".
some notes:
1) I mixed everything by hand, using a large spoon. It wasn't difficult. Perhaps my dough still could stand to be stiffer.
2) I formed the loaves in the metal loaf pan for one, and on a pyrex pie plate for the other, before the second rise. I just used oil on the pans and no parchment paper. I had no trouble with sticking.
3) I used an inverted 12" cast iron skillet as a baking stone for one loaf. It didn't seem to make a difference.
I will continue to tinker with this recipe, but as it is it's the best bread I can eat.
Thanks again, Laurel, for the key to this wonderful bread!
Don
Hi Don! I am so glad to hear the bread is looking better! I love, love the tip to swap out the baking stone for a cast iron skillet. Genius!
I can't wait to make this. What can I substitute for the oil? I'm interested in a fat free option. Could apple sauce work?
Hi Erica, I think that would be the best swap! I haven't tested it myself, and gluten free bread is finicky, but I do think it would work with applesauce substituted for the oil :) Let me know how it turns out!
Hi Laurel!
What would modifications be, if any, for baking at 5000 ft elevation? Also, I do not have a Stand Mixer...could I use a Hand Mixer or just my hands... and still have a successful loaf?
Thank you! Looking forward to giving this a go
Hi Mary! Great questions - I have to admit I am not sure as I have never tested this bread at altitude. I would stick with any changes you regularly make when baking. For the mixer, I would go with just your hands! Hand mixers tend to be too weak to tackle this dough - even the best ones, but I have heard from some others who have made this recipe that with a little elbow grease, the loaf turns out great! Happy baking!
Do you think I could replace the dry ingredients with Premium Gold gluten free ancient grains flour--since I just bought a 5 lb bag of it? There is no recipe for baking bread with it. It contains rice flour, quinoa flour, ground flax, buckwheat flour, amaranth flour, tapioca flour, arrowroot flour, and xantham gum. If not, I would like to use your recipe, but I am allergic to sorghum flour. Could I use another flour or combination of flours such as soy, garbanzo, buckwheat, rye instead? Or could I replace just the sorghum flour with the PG flour?
iam
Hi Jill, great question! Substitutes in GF baking can be tricky since each flour has a different role to play in the recipe. I think your best bet would be to replace just the sorghum with the blend. Since you are substituting a smaller amount of the total flours, you'd have a better chance of the bred turning out. Happy baking!
Before I found sorghum flour, I was replacing that ingredient with oat flour. I have the same result as I get with sorghum.
Hi Laurel. I am looking forward to trying this recipe. You mentioned you used a spice grinder to grind the chia seeds. May I inquire as to what brand you use? The items I have viewed on Amazon frequently state they don't work well for small seeds. Would like to order one I know will be successful!
Hi Sally! Great question. I wish I could link mine, but it is a really old model and is no longer being made. But, here are some that look really similar and have great reviews:
https://amzn.to/3emdZuJ
https://amzn.to/2ZxZfVm
Thanks Laurel! I'll check these out.
I made the bread and the taste is amazing. It didn’t not rise very much but I’ve already ate about a quarter of one of the baguettes. lol
Would it be OK if next time I use rapid rise and add it to the dry ingredients? The yeast I used was the kind that you suggested and it was definitely not expired.
Any suggestions would be greatly appreciated. :-)
Thank you
Hi Flo, sometimes yeast can be tricky! I think the rapid rise would work just fine. You'll want to "watch" for the bread to double in size with each rise and disregard the timing on the recipe as it was intended for active dry yeast. Let me know how it goes!
I'm looking forward to making this bread, however, no matter how much my daughter and I have tried, we can't find the temperature to bake the bread in the recipe. Help! Thanks. Wonderful comments from people.
Laurel, I recently sent you an email saying that I could not find the temp. After reading the recipe for the 3rd time I found it. Can I use a blender or a food processor since I don't have a stand up mixer? Thanks, Susie
Hi Susie, I apologize as I never saw an email hit my inbox. So sorry! I haven't tried it either way so I can't vouch for the results. This is a really sticky and "tough" dough, so I worry it would bog down a blender. A food processor would be your best bet.
The temp is added into the directions right when you should start preheating the oven. I worried adding it too early on would result in an oven that was heating all day.
This is a great gluten free vegan bread receipe! . I did a little subbing- almond flour instead of quinoa flour, buckwheat flour instead of oat flour, reduced the honey as found it a little sweet, but such an easy loaf to cut compared to usual gluten free bread and tasted wonderful. Think I have found our daily bread!
Oh- also subbed flax meal for ground chia seeds. - more affordable and similar nutritional profile. (greetings from Australia)
Hi Bronwyn! So glad to hear that you are enjoying the bread :) It's definitely a favorite in our house!
Hi Laurel, I found your gluten free boule recipe a few years ago, maybe 2017, and made it many times and loved it. I then got into the quarantine sourdough trend and haven't made your bread in a while. I came back to the recipe today to make a loaf for a GF friend, and I was surprised to see it had changed! I'm now looking forward to trying your new and updated recipe (have to say I'm not going to miss grinding chia seeds lol), and was wondering if you could share a bit about why you made the changes you did? Also, instead of the baking stone/pan/ice cubes, could one use a Dutch oven? And if so, how would that change the baking instructions? Thanks!
Hi Catherine! So good to hear from you! Yes, this recipe has changed a bit. I am always baking it at home and tinkering with the recipe, when I found a way to omit the chia seeds (a real pain to grind!) and the recipe turned out even better, I had to update the recipe. The goal was to make it even easier to make.
I haven't baked this bread in a dutch oven, so I can't offer any guidance there. If you give it a try, I'd love to know how it turns out! Happy baking!!
Hello there I was going to try this recipe but in the comments people mention the chia seeds but i cant see any chia seeds in the recipe. Am i missing something? Please let me know before i make it, Thanks so much, the recipe looks like just what i am looking for, Lin
Hi Lin, that is a great question! The recipe is correct as written, no chia seeds. The original version of this recipe did include chia seeds, but the recipe has since been updated and is better without them. Please let me know if you have any more questions! Happy baking!
Thanks so much, I will let you know how i make out with it, Lin
I'd love to hear how it goes, Lin!
Love this recipe -- it slices neatly, has really nice texture and mild flavor that is great for sandwiches. A question: written recipe says 2 loaves, but list of ingredients adds up to about 1 pound. Detailed description and video suggest 1 loaf. So is it 1 loaf or 2 small ones? Thanks!
Hi Ann, thank you so much for your review and catching that inconsistency! You can actually make it either way, two small loaves or one large. The large size is usually my preference. Though I've made it both ways many times.
I'm currently making this bread recipe for the second time. I do not have access to sorghum flour, and am trying adding 1/2 cup each brown rice and oat flour as a substitution as recommended in one of the earlier comments (my first round had a decent texture but the flour substitution I used gave it a strange taste).
My question is on rising -- both the first time and this time, my dough definitely does not double in size; it may increase by 50% at best. The yeast proofed without issue, and I let it rise in a slightly pre-heated oven but still have this problem. I have this issue with other bread recipes as well, so it's definitely not a specific problem with this recipe, but I'm curious if you have any suggestions for how I could have a better rise?
Many thanks!
I would add that I'm using a gas oven!
Hi Megan! Great question. This is what I have been doing recently with the best success - I preheat the oven to 425 degrees and let the bread rise on top of the oven, or right next to it, for both rises. You can also increase each rise time by 30 minutes if needed. The substituted flours may be the problem since they are altering the protein content, absorbency rate, etc. making it tougher to get a full rise. If these tips don't help, I would try adding an additional 2 tablespoons water to your next batch. This could make the dough less dense and improve the rise. Please let me know how it goes!
Hi Laurel,
I’m thrilled to find this recipe! I have a problem though, I’m allergic to psyllium. Is there anything I can substitute?
I have been making sourdough bread for years but am only starting the gluten free journey. Can this be made with sourdough starter? Gluten free of course. Thank you so much!
Hi Siobhán! Great, great questions! For both questions, I want to note that I have some suggestions, but since I haven't tested these substitutions, I can't guarantee results - it may take some testing on your part.
For the psyllium, ground chia seeds are a good substitute. I buy them whole and grind them into a powder in a coffee/spice grinder. Try starting with a 1 to 1 substitute and then adjust from there.
Once you get the recipe down with chia seeds, so you know how the finished product should look and feel, I think you can start trying to make it with GF sourdough starter! It might take some experimentation to find the right amount, but it definitely is possible.
Please let me know how it goes! Happy baking!
Hi there I like the sound of your g/f bread but I have to leave out the yeast as I'm allergic to it. What can you sugges in it's place.
Hi Rose, Unfortunately there is no substitute for yeast in this recipe and it cannot be made without it. There are some yeast-free gluten free bread recipes out there. I would recommend checking one of those out.
I’ve been working on this recipe for awhile. When I first started making it, I used full amounts of psyllium powder (not husk) and substituted oat flour for the sorghum (couldn’t find it). I bake it in 1 qt glass “pans” and use maple syrup. My gluten free customers love it, but it almost always “falls” a little. I have since found sorghum, and have reduced my psyllium powder amount by half (found a husk vs. powder substitution guide). I am still finding it falling - however, the version I make with cinnamon, cranberry, and walnut are doing perfectly, rising well and holding that rise. I will also note that I find the double rise hasn't made a difference and so only do one rise in the pans. I’m wondering about further adjustments to make (maybe less water or more oat flour). I also just realized you changed temperature and baking time since I last looked at your recipe. Thank you - your recipe is well liked and I reference your site whenever anyone asks.
Hi April, great questions here! If all other ingredients are the same as the recipe calls for, I would slowly, bit by bit, increase the psyllium powder you are using. If that still doesn't solve the problem, I would try slowly reducing the water as you've suggested. Happy baking!
This bread, and every one of your recipes, is perfection! I mastered traditional yeasted breads and started experimenting with gluten-free baking recently. Many discouraging fails but your blog was IT!! This is so, so good I could eat a loaf in one sitting, and almost have;) I would stress measuring all ingredients in grams as you have posted- measuring cups alone are inaccurate and will not produce the perfect loaf. I love your blog! Thank you for being a game changer!!
Hi Gigi! Thank you so much for your review. It's a real day maker!
An amazing recipe!! Best no gluten bread I have tasted even when compared to shops! I love it. I added a tiny bit of onion powder and it worked well. Thank you so so much, and hello from Israel ♥
Thank you so much for the review Shireen! I will be trying it with onion powder next time I make it - sounds delicious!
I am in love with this bread and am looking to make something special for Thanksgiving. Could I add cranberries and walnuts to this loaf, or perhaps another one of your loaves, for a festive bread to serve with holiday meals? If so, which loaf would be best and what amounts might you suggest? Thank you so much for your gorgeous blog!!
Hi Solange! Great questions. I think adding in cranberries and walnuts would be absolutely delicious for the holidays! I would mix in 1/2 cup each cranberries and toasted walnuts in step 4, right after the dough comes together. Add the to the mixer and let it mix for 30-60 more seconds until the nuts and cranberries are incorporated. Please let me know if you have any questions! Excited to hear how it turns out!
Your suggestion turned out INCREDIBLE and almost created a different loaf altogether in the most perfect way! I enjoyed a slice as a breakfast bread with softened grass-fed butter and it’s simply so delicious! I’d love to think that the sky is the limit as far as adding dried fruits and nuts. Thank you so much for this- all of your breads and recipes are absolutely gorgeous and truly delectable!
Thank you so much for the update Solange! I am so glad to hear it worked so well! I will definitely be making it ASAP.
I have a daughter-in-law who cannot eat oats, so substituted almond flour and it turned out great, as it does with oat flour. Thanks again!
I echo many of the comments here: this is a great recipe. I SO appreciate bread that is bread and not eggs, starch, and oil.
I have a few thoughts and tweaks that I hope are helpful:
1. I baked this bread at 475 in an enamel pot with lid on for 60 min and 5 min with the lid off. The pot preheated in the oven for 1 hr before baking. I also placed the pot on a baking sheet to protest the bottom crust. I thought this tweak resulted in a superior crust.
2. The first time I baked this I subbed buckwheat flour for the quinoa flour (which I dislike). It turned out fine. The second time I used: 130 g millet flour, 170 g brown rice flour, and 125 g oat flour. This resulted in a very nice flavor. For those worried about substituting flours, I wouldn't stress too much as long as you are going by weight (and not trying to only use very dense flours, like teff). Sorghum, millet, and brown rice are pretty versatile bases. Buckwheat, too, but it has a pretty strong flavor.
3. The next time I bake this I'm going to do the second proof in the fridge because mine spread (predictably) after a room temp second proof when I removed it from the proofing basket for scoring. I do this with my sourdough gf loaf and it generally doesn't spread.
Thank you for the review and all your wonderful insight Kara! Excited to hear how proofing it in the fridge goes.
Can I use garbanzo bean flour in place of quinoa? Also chia powder instead of psyllium.
If so, is it a 1:1 conversion?
Hi Vid, I would not recommend either substitution. Garbanzo bean flour absorbs too much water and would make the bread dense. Chia seeds and psyllium are also not comparable and create very different results.
I just made this recipe twice in three days. It’s amazing! I made my own quinoa flour and oat flour, which gives it a great toasty flavor. Second time around, I mixed up three batches of the flour blend so that I can whip these up more quickly next time. So good!
Thank you so much for your review, Laura! So glad you are enjoying the bread :)
Good morning,
If you only have ground psyllium husk can you use it and how much would you use?
Kate
Hi Kate! Great question. To properly substitute ground psyllium husk for whole, you will need to weigh it out with a kitchen scale. 30 grams of whole husk and ground will act the same in this recipe. Happy baking!
First time I've ever left a comment. Simple, moist and delicious bread. I substituted white for brown rice flour and teff for quinoa. so good. Thank you.
Thank you so much for the comment Katherine! So glad you are enjoying the recipe. It's a family favorite over here :)
I've probably made this recipe 25 times over the last few years. I think I finally found a method that works for me: I add a little bit of olive oil, but otherwise I follow the ingredients. I only do one rise, in a bowl on top of a piece of parchment paper. Then I carefully lift the paper onto a sheet pan and bake without steam. I got tired of retreating my cast iron skillet. And I seem to get the best rise/crumb this way! It also seems to bake better and more evenly than when I use a dutch oven. I weigh out several batches of dry ingredients at once, and keep them in the freezer in jars!
I’ve made this beautiful loaf many times and it’s delicious. I’d like to do a replica of a seeded wheat challah I used to enjoy before going gluten-free. It had a mix of seeds sprinkled atop (egg wash) and also had whole millet in the dough as well, perhaps two tbsp or so. Any clues as to if and how I could try to incorporate both of those aspects to create a variation of this (already perfect of course) loaf?
Hi Vanessa! I too love challah, but I wouldn't try changing this recipe. This dough can't support the extra butter and eggs that make challah, challah.
This recipe is such a great find - it's really *great.* Thank yo so much! I have a couple of questions:
- what should I take in consideration when trying to bake two loaves at once? Will they need more time in the oven?
- I'd like this to have an oval shape instead of round to make for easier slices that fit in the toaster - is there anything special to consider when shaping the loaf for the second rise in an oval proofing basket?
Many thanks!
Hi Monica, Great questions! Baking two loaves at once should not affect oven time. I love to bake this bread as an oval batard as well. I don't have a tutorial on my site, but I shape it the same way you would shape a standard wheat-based batard. I like this tutorial! Instead of stretching as the post suggests, press down on the dough as you are shaping. Happy baking!
Cool tutorial! Thank you very much, Laurel!
Hello, I made this bread today, following the recipe as written, and the texture was good but the bread had a bitter aftertaste. Any ideas? Thank you